Notifications
The Notifications page gives you an overview of all email and push notifications sent within a realm, and lets you send new ones directly from the Manager UI. You can find it in the settings menu (the dots on the top right) under Notifications. The page shows the notifications of the realm that is currently selected in the realm picker.
The Notifications page provides three capabilities:
- Overview — browse, filter and sort all notifications that were sent, whether they came from rules, the platform itself, or an API client
- Send — write an email or push notification and send it to users, users linked to assets, or all users in a realm
- Details — look at the full content, recipient and delivery status of a single notification
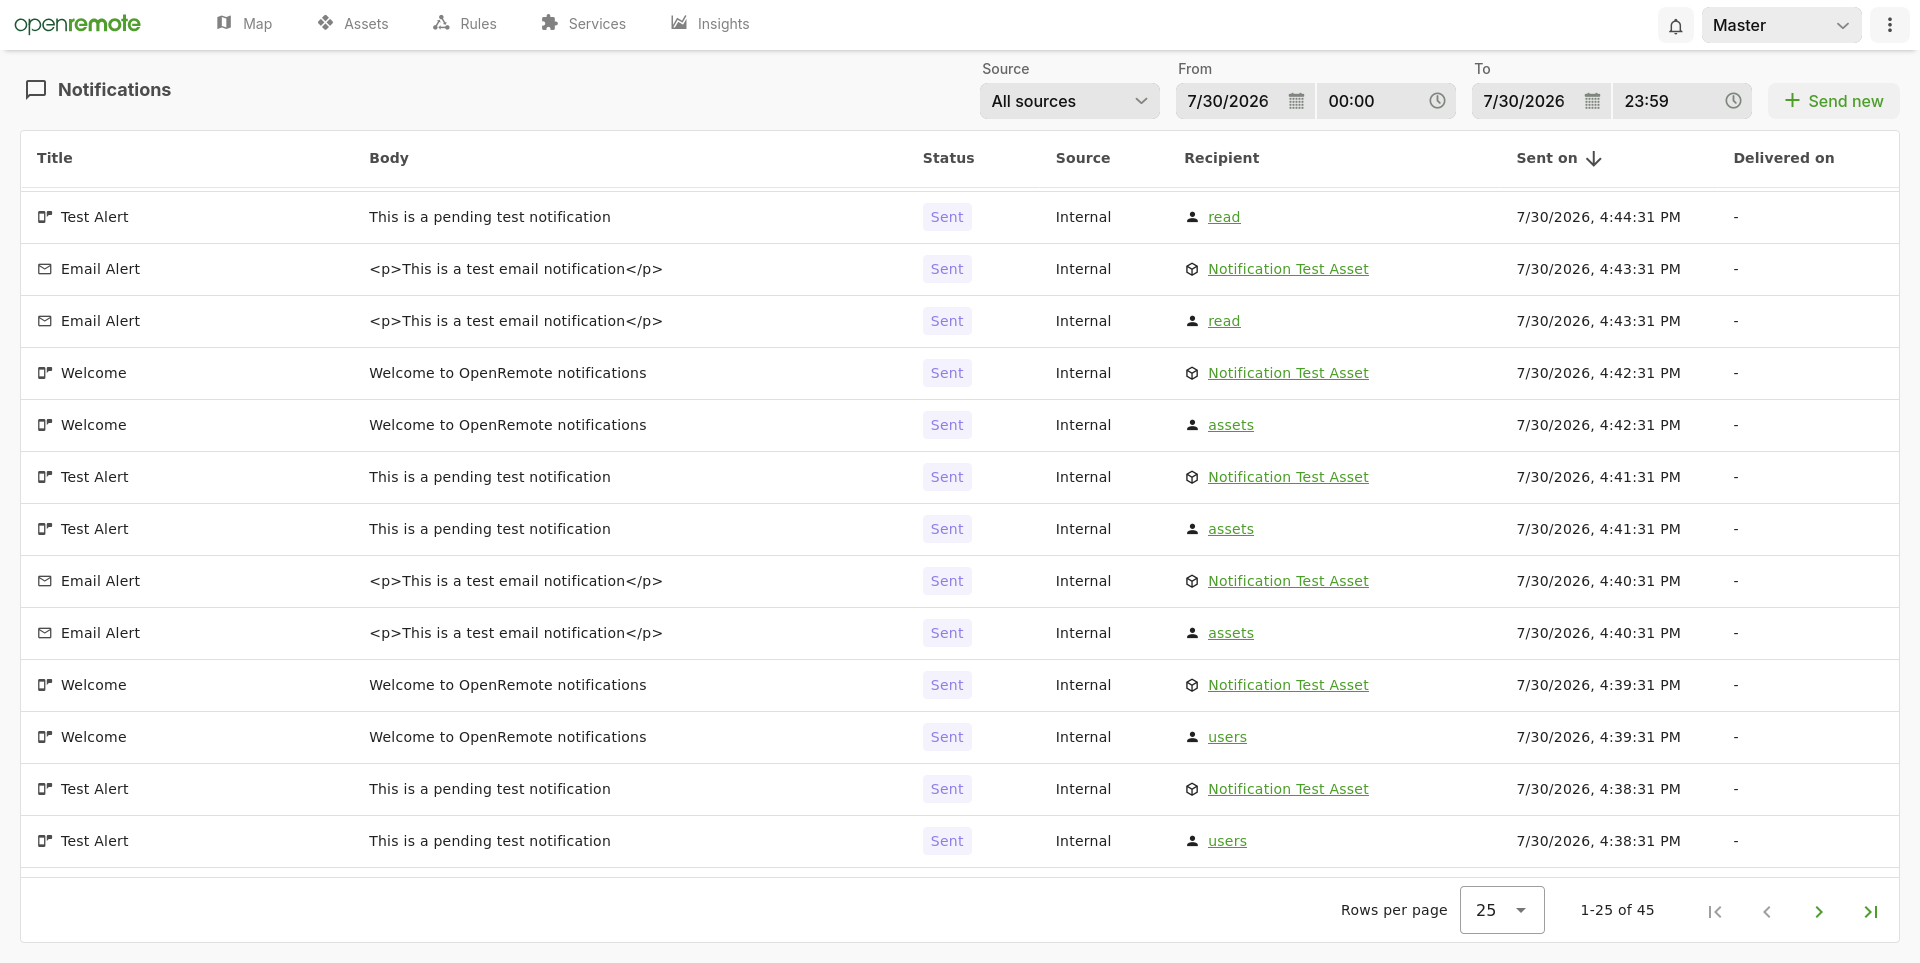 Figure 1. The Notifications page with an overview of all sent notifications.
Before you start
Notifications are only delivered when the matching channel is configured for your deployment:
| Channel | Requirements |
|---|---|
An SMTP server, configured using the OR_EMAIL_HOST, OR_EMAIL_USER, OR_EMAIL_PASSWORD and OR_EMAIL_FROM environment variables. See setting environment variables. Recipients need an email address. | |
| Push | A Firebase Cloud Messaging configuration file, set using the OR_FIREBASE_CONFIG_FILE environment variable. See Push Notifications / FCM setup. Recipients need the OpenRemote app (or your own console app) with push notifications enabled. |
If a channel is not configured, sending a notification of that type fails and nothing is added to the overview. When you run the manager in dev mode without this configuration, notifications are recorded in the overview and written to the log instead of being sent.
Required roles
Access to the page is controlled by two roles, which you can assign on the Roles page:
| Role | Description |
|---|---|
read:notifications | View the Notifications page and the notifications sent within the realm |
write:notifications | Send notifications, using the Send new button or the API |
The admin roles don't give access to this page: users with read:admin or write:admin still need the notification roles above. Some parts of the page need additional roles:
- Recipients — to select users you need
read:users, and to select assets you needread:assets;read:adminworks for both. Without these roles, the recipients of users or assets are shown as-in the overview. TheSend newbutton only appears if you havewrite:notifications, and is disabled if you can't select any recipients. - All users in a realm — only superusers can send a notification to every user in a realm.
- Restricted users — a restricted user only sees notifications they sent themselves, notifications sent to them, and notifications sent to their whole realm. They can only send notifications to users linked to the assets they are linked to.
When you upgrade an existing installation, read:notifications and write:notifications are automatically added to the default read and write roles in every realm. Custom roles that you created yourself do not get them, so add the roles there if needed.
Sending a notification through the API now requires the write:notifications role as well. Give this role to any service user that sends notifications.
Viewing sent notifications
The overview shows one row per recipient that was reached: a user or asset for an email, or a device with the app for a push notification. A user with two phones gets two rows for one push notification, and recipients that can't be reached get no row. By default, you see the notifications sent today, with the newest first.
| Column | Description |
|---|---|
| Title | The title of a push notification or the subject of an email. The icon in front shows whether it was a push notification or an email |
| Body | The message of the notification. For emails this is the HTML that was sent |
| Status | Whether the notification was sent or failed. See Status |
| Source | What sent the notification. See Source |
| Recipient | The user, asset or realm that received the notification. Users and assets link to their page in the Manager UI |
| Sent on | The moment the notification was sent |
| Delivered on | The moment a console app confirmed that it received the notification (push notifications only) |
Delivery confirmation does not work at the moment. The Delivered on column stays empty, and push notifications keep the Sent status, even when they arrived on the device.
Click a column header to sort by that column; click again to reverse the order. You can sort by Title, Status, Source, Sent on and Delivered on. Sorting is applied to all notifications, not just the current page. Use the controls at the bottom of the table to change the number of rows per page and to move between pages.
Status
| Status | Description |
|---|---|
Sent | The notification left the platform: it was accepted by the email server or by Firebase |
Delivered | A console app confirmed that it received the push notification. Emails never get this status. Not set at the moment, see the note above |
Error | Sending failed. Hover over the status to see the reason |
Source
| Source | Description |
|---|---|
| Internal | Sent by the platform itself, for example by a service or by custom code running in the manager |
| Client | Sent through the API by a user or service user. Notifications you send with Send new also get this source |
| Global ruleset | Sent by a global rule, such as a When-Then rule or Groovy rule |
| Realm ruleset | Sent by a rule in the realm |
Filtering notifications
Use the controls at the top of the page to narrow down the overview:
| Filter | Description |
|---|---|
| Source | Only show notifications from one source. The default is All sources |
| From / To | Only show notifications sent within this period. The default is today, from 00:00 to 23:59 |
To see the notifications of another realm, select that realm in the realm picker. A notification is listed in the realm of its recipient, so a notification sent from the master realm to a user in another realm shows up in that other realm. If the recipient's realm cannot be determined, the notification is listed in the realm of the sender. For global rules and internal notifications, that is the master realm.
Sending a notification
To send a notification, you need the write:notifications role.
- Click
Send newon the top right of the page. - Select the recipients: choose a Recipient type and select one or more recipients.
- Choose the Type of notification,
PushorEmail, and enter its content. - For push notifications, optionally configure the Actions.
- Click
Create.
The Create button is only enabled when you have selected at least one recipient, filled in the title or subject and the body, and entered a valid website URL (if you entered one). After the notification is sent, the overview reloads and shows the new notification with the source Client.
Recipients
| Recipient type | Who receives the notification | Availability |
|---|---|---|
| Users | The selected users of the current realm | Requires read:users. Not available for restricted users |
| Users linked to assets | The users linked to the assets you select in the asset tree | Requires read:assets. Restricted users can only select assets they are linked to |
| All users in realms | Every user in the selected realms | Superusers only |
How recipients are reached depends on the type of notification:
- Email — sent to the email address of each user. For
Users linked to assets, the email is also sent to the address in theemailattribute of the asset, if it has one. - Push — sent to the console apps (for example the OpenRemote app on a phone) that are registered by the users. For push notifications the recipient in the overview is therefore the console asset, one row per device.
Service users, users without an email address (for email), users without a registered console app (for push), and users who turned off that type of notification never receive it.
Content
| Field | Description |
|---|---|
| Type | Push for a notification on a mobile device, or Email |
| Title / Subject | The title of the push notification or the subject of the email. Required |
| Body | The message. Required. Emails are sent as HTML, so use tags such as <p>, <br> or <a> for formatting; line breaks are not kept otherwise |
Actions
Push notifications can include an action and buttons. All fields are optional.
| Field | Description |
|---|---|
| Website to be opened | The URL opened when the recipient taps the notification. The URL must include a scheme, such as https://example.com |
| Open in browser (for external websites) | Opens the website in the browser of the device instead of inside the app |
| Text for action button | Adds a button with this text. The button opens the website |
| Text for decline button | Adds a button with this text that dismisses the notification |
| Priority | Normal or High. Only applies to Android devices, where high priority notifications are delivered immediately, even when the device is idle. iOS devices always receive push notifications with high priority |
When sending fails
If sending fails, you will see the message Failed to send notification. This happens when:
- none of the selected recipients can be reached, for example because the users have no email address or no console app with push notifications
- you are not allowed to send to one of the selected recipients
- the email or push channel is not configured
If the notification was sent to some recipients but failed for others, rows with the Error status are added to the overview for the recipients that failed. Close the dialog to see them.
Examples
The examples below show which fields to fill in for common situations. See Sending a notification for a description of all fields.
Send an urgent push notification to specific users
- Click
Send new. - Set Recipient type to
Usersand select the users. - Set Type to
Pushand enter a Title and Body. - Under Actions, set Priority to
High. This makes a difference on Android devices only; iOS devices always receive push notifications with high priority. - Click
Create.
Open a website from a push notification
- Click
Send new, select the recipients, and set Type toPushwith a Title and Body. - Under Actions, enter the address in Website to be opened, including the scheme, such as
https://. - Turn on Open in browser (for external websites) to open the website in the browser of the device. Leave it off to open the website inside the app.
- Click
Create.
Recipients open the website by tapping the notification.
Add buttons to a push notification
Buttons let recipients respond directly from the notification, for example to view more details or to dismiss the message.
- Click
Send new, select the recipients, and set Type toPushwith a Title and Body. - Under Actions, enter the Website to be opened. The action button opens this website.
- Enter the Text for action button, for example
View details. - Enter the Text for decline button, for example
Dismiss. - Click
Create.
Always fill in the Text for action button when you add a decline button. If you enter a website but only a text for the decline button, that button opens the website instead.
Email the users linked to an asset
Use this, for example, to inform the users responsible for a building or a machine. First make sure these users are linked to the asset and have an email address.
- Click
Send new. - Set Recipient type to
Users linked to assetsand check the assets in the asset tree. - Set Type to
Emailand enter a Subject. - Enter the Body as HTML, for example
<p>The heating will be serviced on Monday.</p>. - Click
Create.
If an asset has an email attribute, the email is also sent to that address.
Send an announcement to all users in a realm
Only superusers can send a notification to every user in a realm.
- Click
Send new. - Set Recipient type to
All users in realmsand check one or more realms. - Choose the Type and enter the content.
- Click
Create.
A push announcement reaches every console app with push notifications enabled in the selected realms. An email announcement reaches every user with an email address. Each user (for email) or device (for push) gets its own row in the overview.
Check whether a rule sent its notifications
When a rule should have sent a notification but nobody received it, use the overview to find out what happened.
- In the realm picker, select the realm of the recipients.
- Set Source to
Realm rulesetorGlobal ruleset, depending on where the rule is defined. - Set From and To to the period in which the rule should have triggered.
- Find the notification by its title and check the Status:
Sent— the notification left the platform. If it did not arrive, check the recipient's email or the notification settings of the app.Error— hover over the status to see why sending failed.
If there is no row at all, either the rule did not trigger, or none of its recipients could be reached, for example because they have no email address or no app with push notifications enabled.
Viewing notification details
Click a row in the overview to open the notification details. The details are read-only and show:
- Recipient — the recipient type and the ID of the recipient
- Content — the type, title or subject, and body
- Actions — the website, button texts and priority (push notifications only)
- Properties — the source, status, and the moments it was sent and delivered. If you have the
read:usersrole, the source also shows the ID of the sender, such as the user forClientor the realm forRealm ruleset
The IDs of users and assets are only shown when you have the read:users or read:assets role. Push device tokens are never shown.
Using the API
You can also retrieve and send notifications through the HTTP API, for example to send notifications from an external application. Notifications sent this way get the source Client and require the same roles as the Notifications page:
| Operation | Endpoint | Required role |
|---|---|---|
| Retrieve notifications | GET /api/{realm}/notification | read:notifications |
| Count notifications | GET /api/{realm}/notification/count | read:notifications |
| Send a notification | POST /api/{realm}/notification/alert | write:notifications |
The linked REST API pages describe the parameters and request bodies. For authentication, see Manager APIs.