AWS Marketplace
This guide explains how to provision/configure OpenRemote via the AWS Marketplace. The CloudFormation template can be found at cloudformation-aws-marketplace.yml.
This product requires an internet connection to deploy properly. The following packages are downloaded on deployment:
DockerDocker Compose
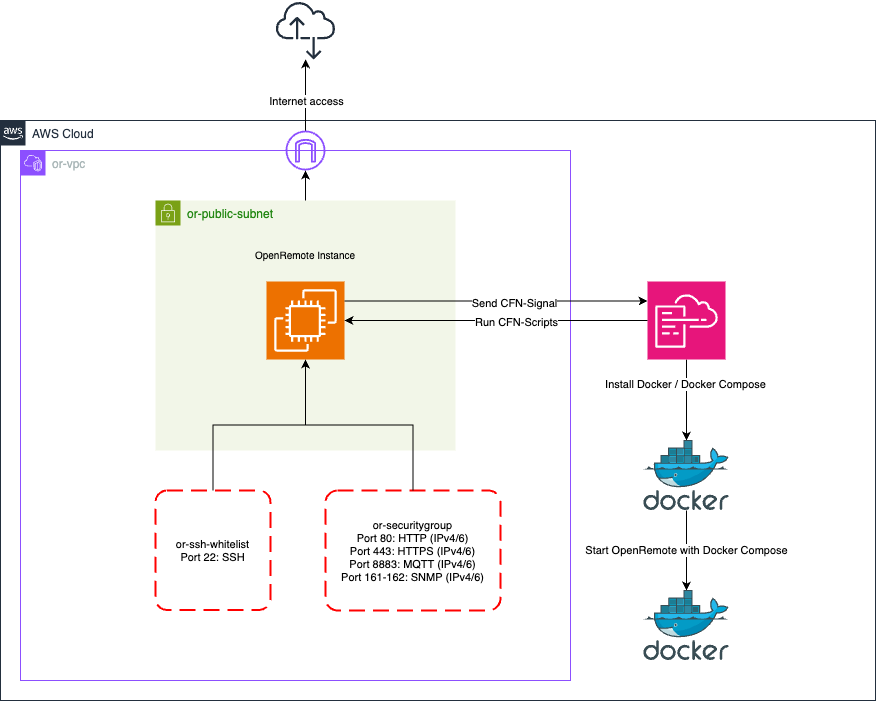
Architecture Diagram
Subscribe to the AWS Marketplace
To use OpenRemote through the AWS Marketplace, you need an active subscription. Follow the steps below to subscribe.
- Search for OpenRemote on the AWS Marketplace, or click directly on the listing.
- Click the 'View purchase options' button.
- Accept the EULA by selecting 'Accept Terms'.
- You are now subscribed on OpenRemote via the AWS Marketplace. Processing the subscription will take a few minutes. Once completed, the 'Continue to Configuration' button becomes available.
- Click 'Continue to Configuration' to start configuring OpenRemote.
- Choose a template version (the latest version is selected by default) and select your preferred AWS region for deployment.
- Click 'Continue' to launch after making your selections.
- Review your selections and click 'Launch' to proceed. You will be redirected to the AWS CloudFormation page.
- On the AWS CloudFormation page, click 'Next' to continue.
Instance Configuration
After subscribing on OpenRemote via the AWS Marketplace, you can start configuring it. Below, you will find a detailed description of each parameter available in the template.
-
Stack name - You need to specify a unique CloudFormation stack name for this deployment. The stack name must contain only letters (a-z, A-Z), numbers (0-9), and hyphens (-) and start with a letter. Max 128 characters.
-
Hostname - You can specify the fully qualified domain name (FQDN) you want to use for this OpenRemote instance.
If no value is provided, you can access OpenRemote using the public IPv4 address of the EC2 instance. -
Instance type - You can choose from the following t4g and m6g instance types:
t4g.small- vCPU: 2
- Memory: 2GB
t4g.medium- vCPU: 2
- Memory: 4GB
t4g.large- vCPU: 2
- Memory: 8GB
m6g.large- vCPU: 2
- Memory: 8GB
m6g.xlarge- vCPU: 4
- Memory: 16GB
Prices vary based on the selected instance. All instances are using the ARM architecture. For detailed pricing information, visit the pricing pages for t4g and m6g.
-
Amazon Machine Image - This is the Amazon Machine Image (AMI) that is used by the EC2 instance.
dangerDo not modify this value, as it is provided by Amazon. Changing it may cause instance creation to fail.
-
Storage - You can specify the amount of block storage to provision for this OpenRemote instance, with options of
32GB,48GBand64GB. It is possible to expand the volume after instance creation, but a reboot will be required. -
Key pair - Choose a key pair for this OpenRemote instance. With the selected key pair you can SSH into the machine. You can only select a key pair that was created in the same region as where you want to deploy the OpenRemote instance.
tipTo create a new key pair, follow the steps provided here.
dangerAfter creating the key pair, you receive a private key.
Make sure to save this file on a secure location, as you will not be able to SSH into the machine without it. If you accidentally lose your key, follow the steps provided here to recover access to your instance.
-
Elastic IP - You can choose whether to assign an Elastic IP to this OpenRemote instance. Enabling this option ensures that your IPv4 address remains the same after stopping the instance. Additional charges may apply, visit the pricing page here.
OpenRemote Configuration (Optional)
- Password - You can override the default password by providing a new password.
There are no specific requirements for this password. If you do not provide one, you can log in to the manager using the default credentials (username
adminand passwordsecret).
E-mail Configuration (Optional)
- SMTP Hostname - You can specify the hostname that will be used for sending e-mails. (e.g. mail.example.com).
- SMTP Username - You can specify the username for authenticating with the SMTP server. In most cases this is the e-mail address of the sending account.
- SMTP Password - You can specify the password for authenticating with the SMTP server.
- SMTP From Address - You can specify the e-mail address that will be used as the sending address. The e-mail address is visible for the receivers. (e.g. no-reply@example.com).
OpenRemote installation
Once you've entered all the required details, click the 'Next' button at the bottom of the page. You’ll be taken to a configuration page where you can configure various stack options. There’s no need to make any changes here, simply click 'Next' again. On the final page, you'll see a summary of your deployment. Review the information, then click the 'Submit' button at the bottom to confirm and proceed.
Amazon is provisioning the EC2 instance using the provided CloudFormation template, this process takes around 5 to 10 minutes. You can monitor the progress by regularly refreshing the page using the refresh button located on the right-hand side.
The latest version of OpenRemote will be installed. Click here to see the latest release.
After the EC2 instance is successfully provisioned, the CREATE_COMPLETE status will appear on the CloudFormation page.
To start using OpenRemote, either visit the hostname you specified during configuration or navigate to the EC2 page and locate the instance named OpenRemote and look for the IPv4 address.
You can also view the IPv4 address by clicking on the outputs section of the CloudFormation stack.
If you have configured a custom hostname, make sure to add an A record pointing to the instance's IPv4 address in your DNS.
How can I access the EC2 instance?
You can access the EC2 instance via SSH by following the steps below.
- Navigate to the EC2 page, then click on 'Security Groups' located under the 'Network & Security' section on the left-hand menu.
- Locate the security group named
<AWS_STACKNAME>-or-ssh-whitelist(make sure to replace<AWS_STACKNAME>with the stack name you specified during configuration) and click on it. - In the inbound rules section, click the 'Edit inbound rules' button.
- Click the 'Add rule' button to insert a new entry in the inbound rules section.
- Set the
typetoSSH, and enter your IP address in the source field. You can find your IP address here. - Click the 'Save rules' button to apply the changes.
- You've now whitelisted your IP address to access the EC2 instance. To connect, open your terminal and run the following command:
ssh ec2-user@<PUBLIC_IP>
Make sure to replace <PUBLIC_IP> with the instance's IPv4 address or the hostname you have provided during configuration.
To SSH into the machine, ensure that your key pair is saved in the .ssh directory.
Where can I find the installation files?
The installation files are located in the /home/ec2-user/ directory. You can navigate to it using the following command:
cd /home/ec2-user/
The data from the platform is stored in persistent Docker volumes, located in the /var/lib/docker/volumes directory.
Unsubscribe from the AWS Marketplace
To stop using OpenRemote from the AWS Marketplace, you can unsubscribe by following the steps below.
- Visit the AWS Marketplace subscriptions page by clicking here.
- Find the OpenRemote subscription in the list and click on it.
- Click the 'Actions' button, then select 'Cancel Subscription'.
- A modal pops up asking you to confirm the cancellation of the subscription.
- To confirm cancellation, type 'confirm' in the designated input field and click the 'Yes, cancel subscription' button.
To cancel the subscription, you must first delete the OpenRemote stack created with it.