Energy Management
Introduction
OpenRemote can be used as an Energy Management System (EMS) for your own microgrid. The EMS schedules the power setpoints of energy consuming devices and storage devices, taking into account renewable energy production (including forecasts), energy consumption (including forecasts), agile tariffs from your energy provider and required charge schedules for your electric vehicles. The optimisation routine targets lowest costs or lowest carbon exhaust. Figure 1 gives an overview of all the pieces of an EMS.
In this electricity example, we will connect a series of electricity producers: solar panels and a wind turbine, an electricity consumer: an energy meter, a static battery, and a charger with an electric vehicle. We are adding the forecasting services for both production and consumption and connecting the agile supplier tariffs. Finally, the optimisation service will control the setpoint power of the battery, as well as the vehicle and calculate your savings.
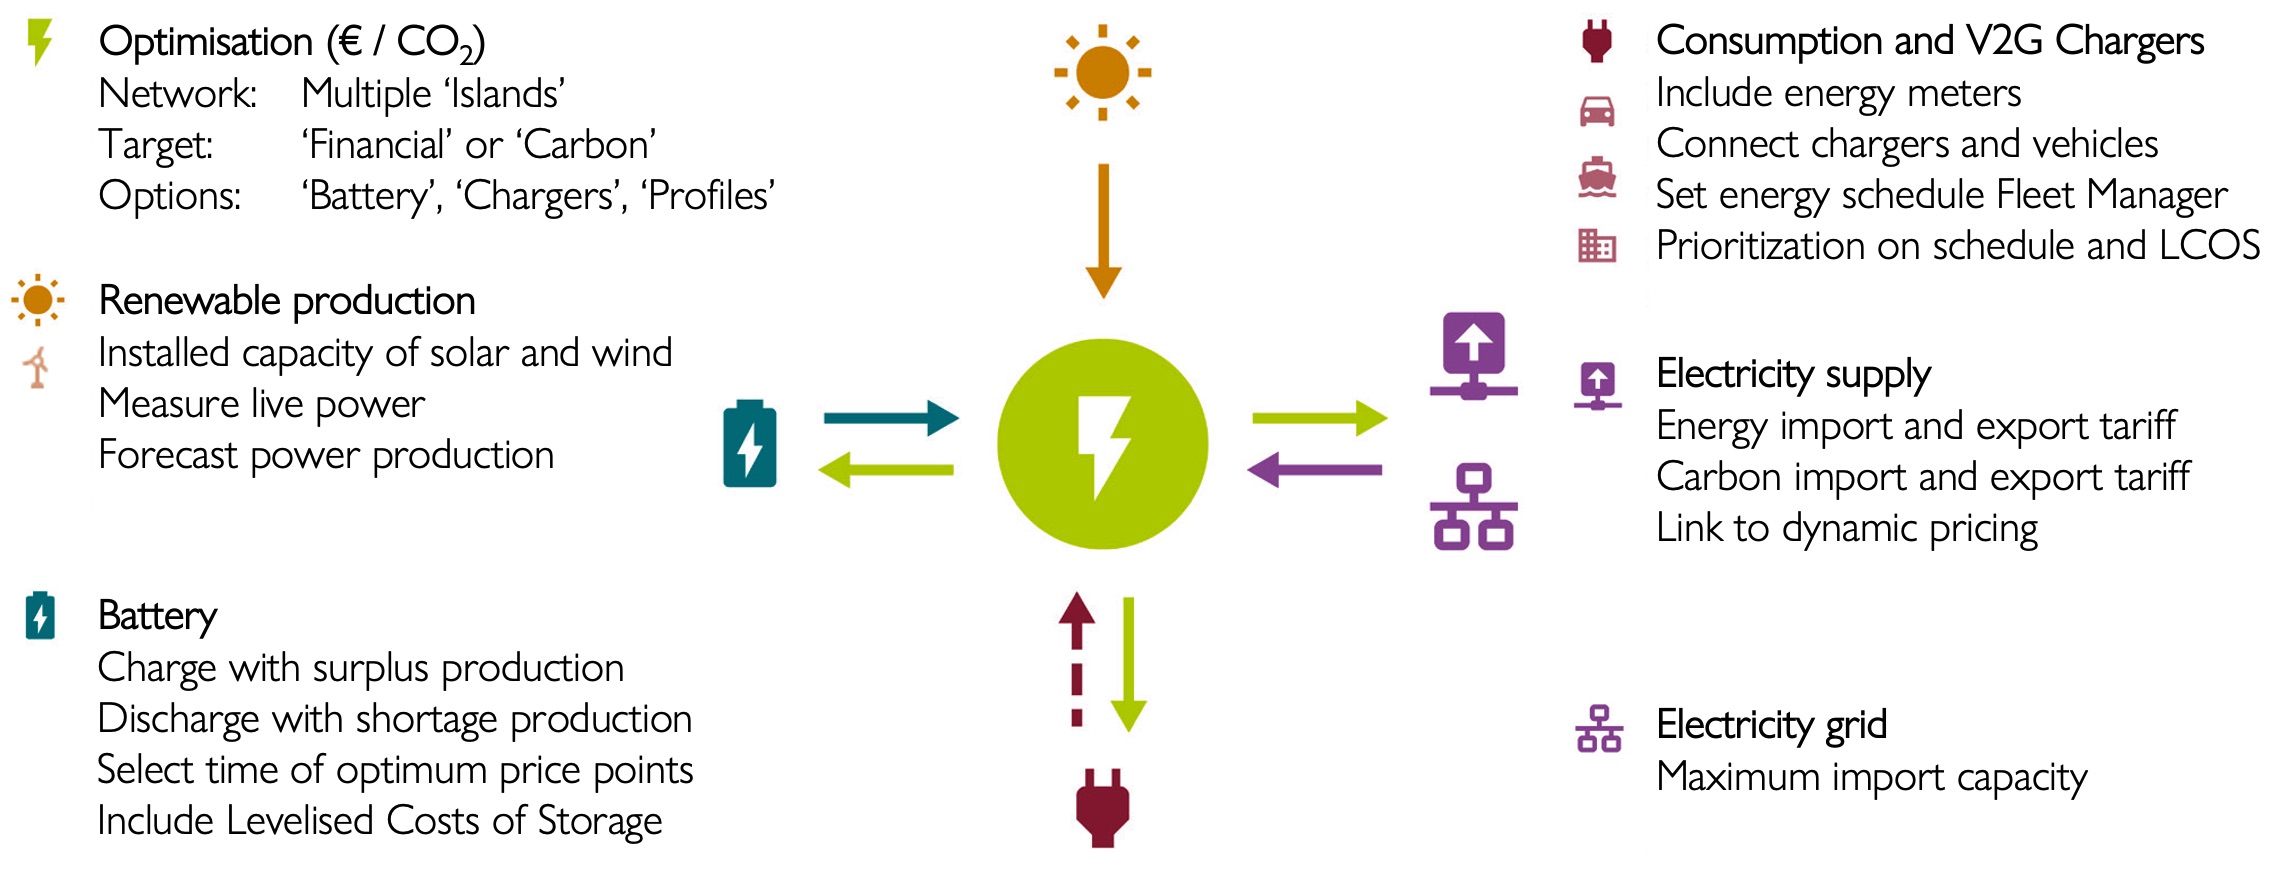 Figure 1. Overview of Energy Management System and all the elements.
Set up OpenRemote and customisation
Before you start, we assume you have set up the latest version of OpenRemote. If not, check out the Quick Start first. Also have a look at how to use the Manager UI to first familiarise yourself with OpenRemote.
To run a full Energy Management System you will need to set up a Custom Deployment. There are many items you can configure with the custom deployment but critical is to add the access keys for two external services: OpenWeather and Forecast.Solar. These services are used to forecast the generated power of your solar panels and wind turbine. For getting these access keys see the Solar forecast service and the Wind forecast service. Once you have the keys, you need to add these as environment variables OPEN_WEATHER_API_APP_ID and FORECAST_SOLAR_API_KEY to your custom deployment and the Docker Compose file. Carefully read Custom Deployment on how to do this.
Electricity assets and required agents
If you navigate to 'Assets' and add an asset, using the '+' button. You will see a list of asset and agent types. A subset of these asset types are intended to set up your own EMS. They include the relevant attributes and configuration setting such that the optimisation service can recognise and manage them.
We'll be setting up a series of these assets, step-by-step, which will give you a structure of your EMS as shown in figure 9.
Optimisation
An optimisation asset represents the optimisation service. It will take into account all assets which are added as children of this asset. So first add an Optimisation asset at the root of your asset tree on the left and give it a name. We'll explain later how the optimisation actually works, after adding all the other assets.
Electricity Producers
We are first adding the (renewable) energy production, by adding a PV solar Asset (Your solar) and a Wind turbine Asset (Your wind). Both need to be added as children of the Optimisation Asset. These assets include a series of standard attributes as shown in figure 2 and 3.
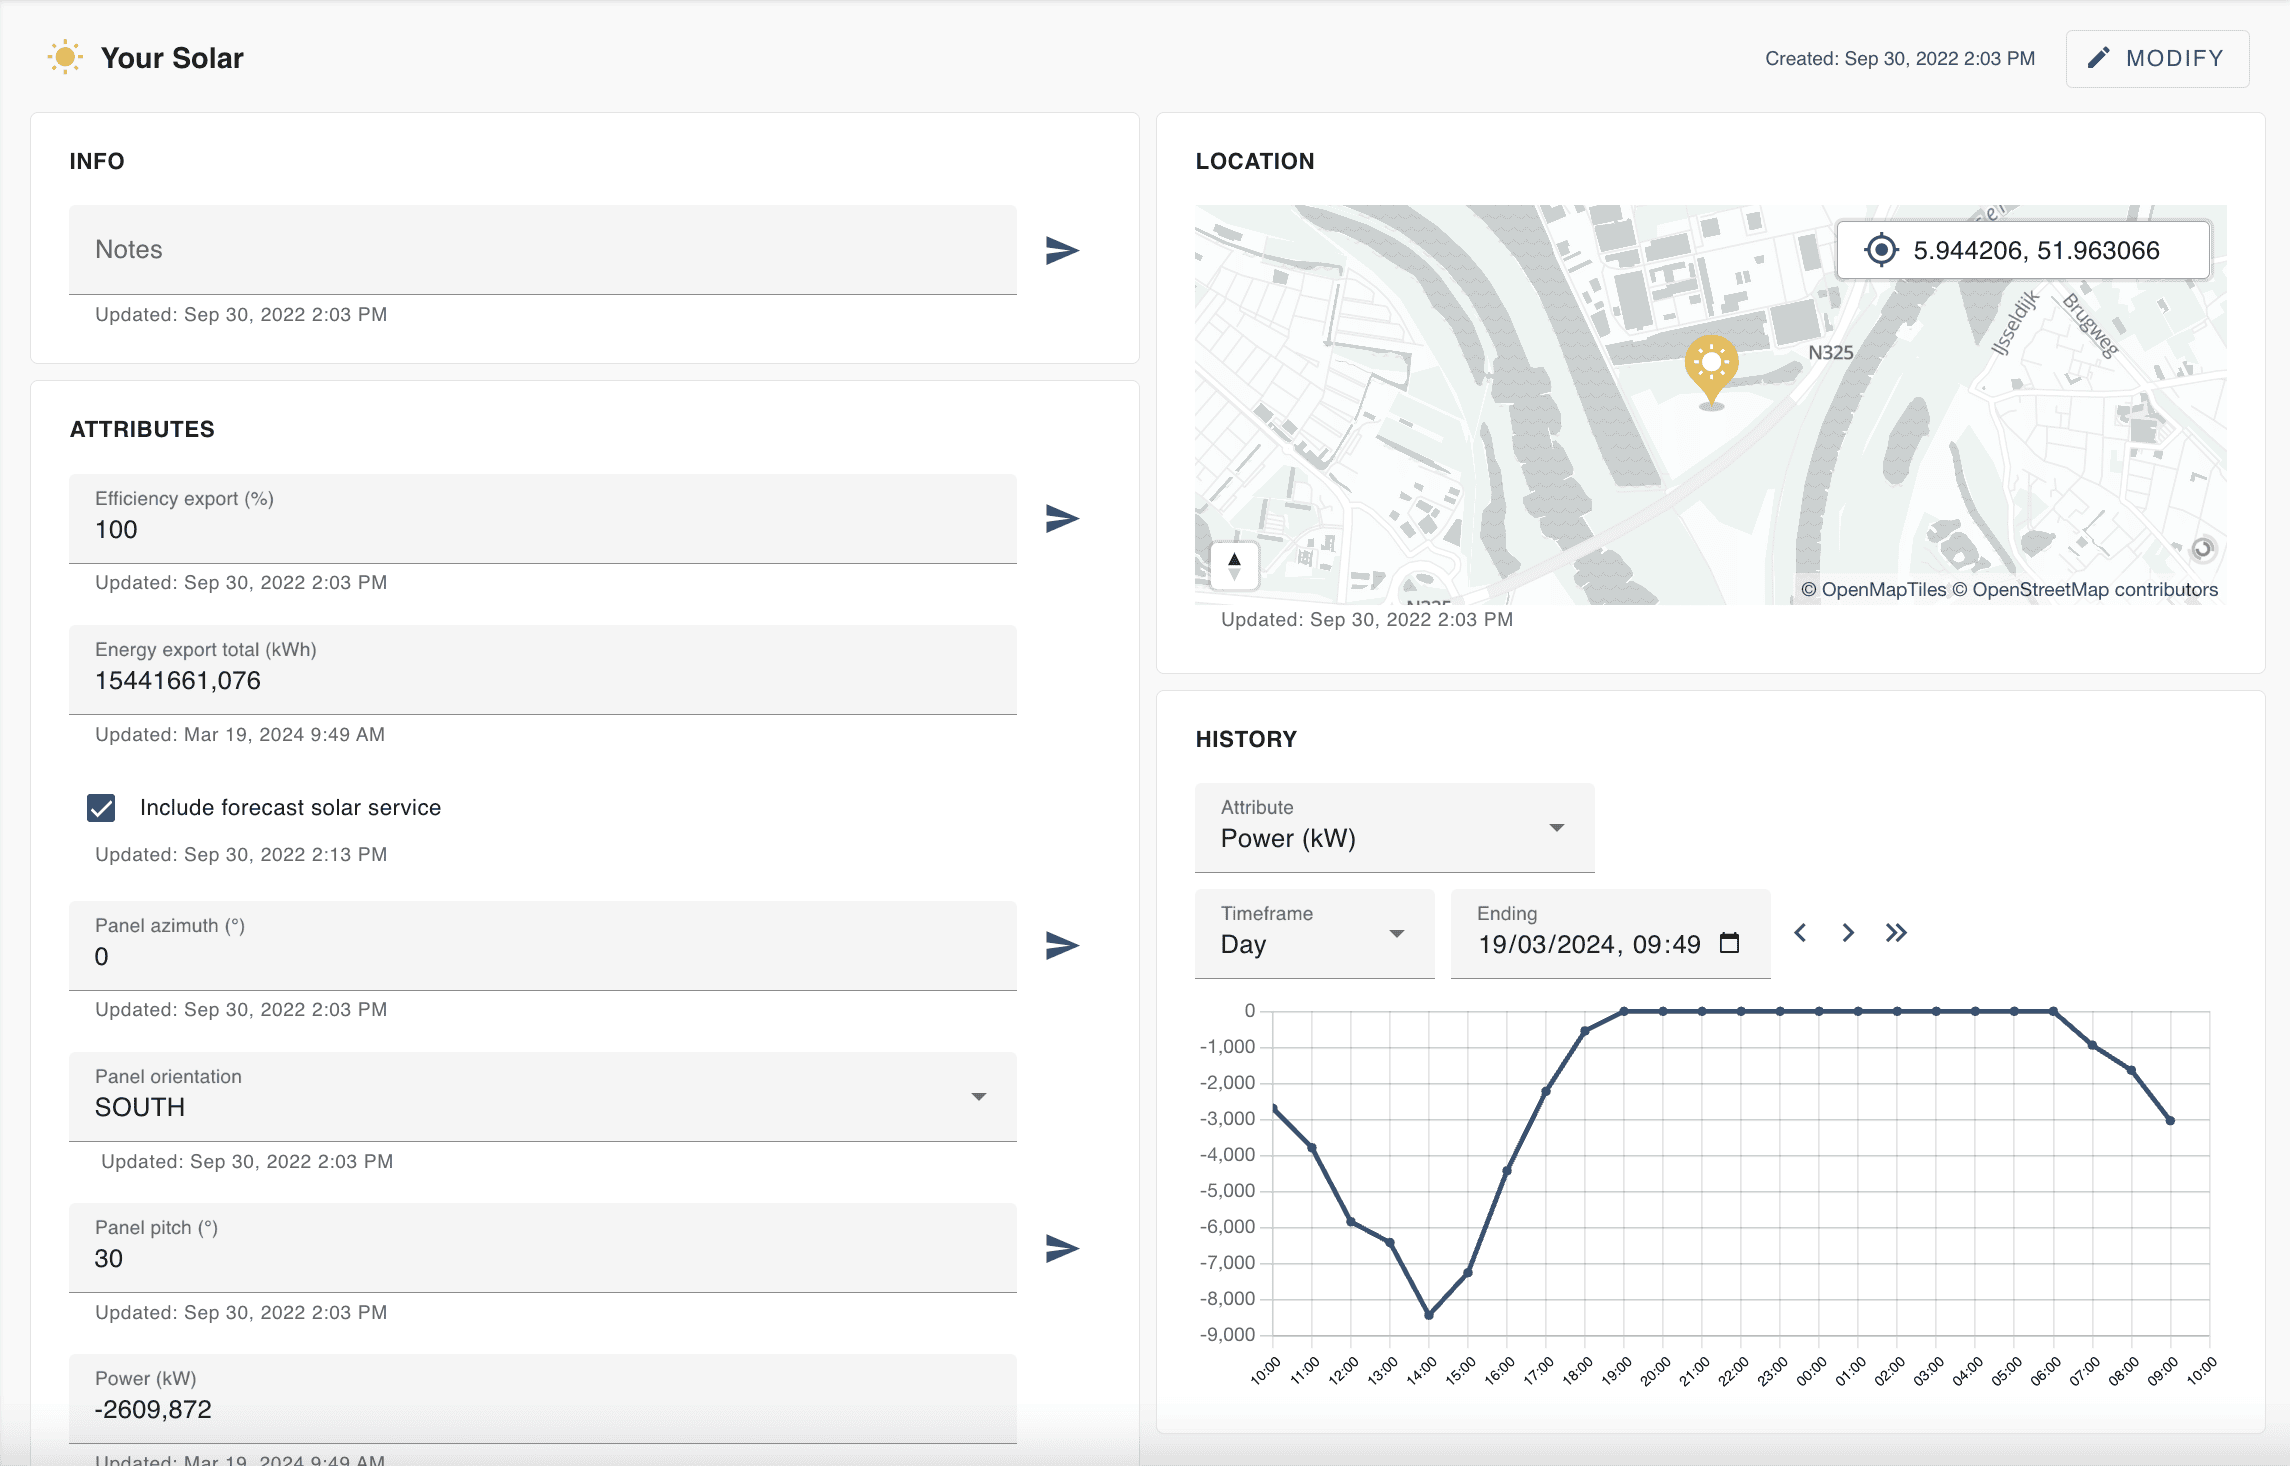 Figure 2. The PV Solar asset (Your solar) with the respective attributes.
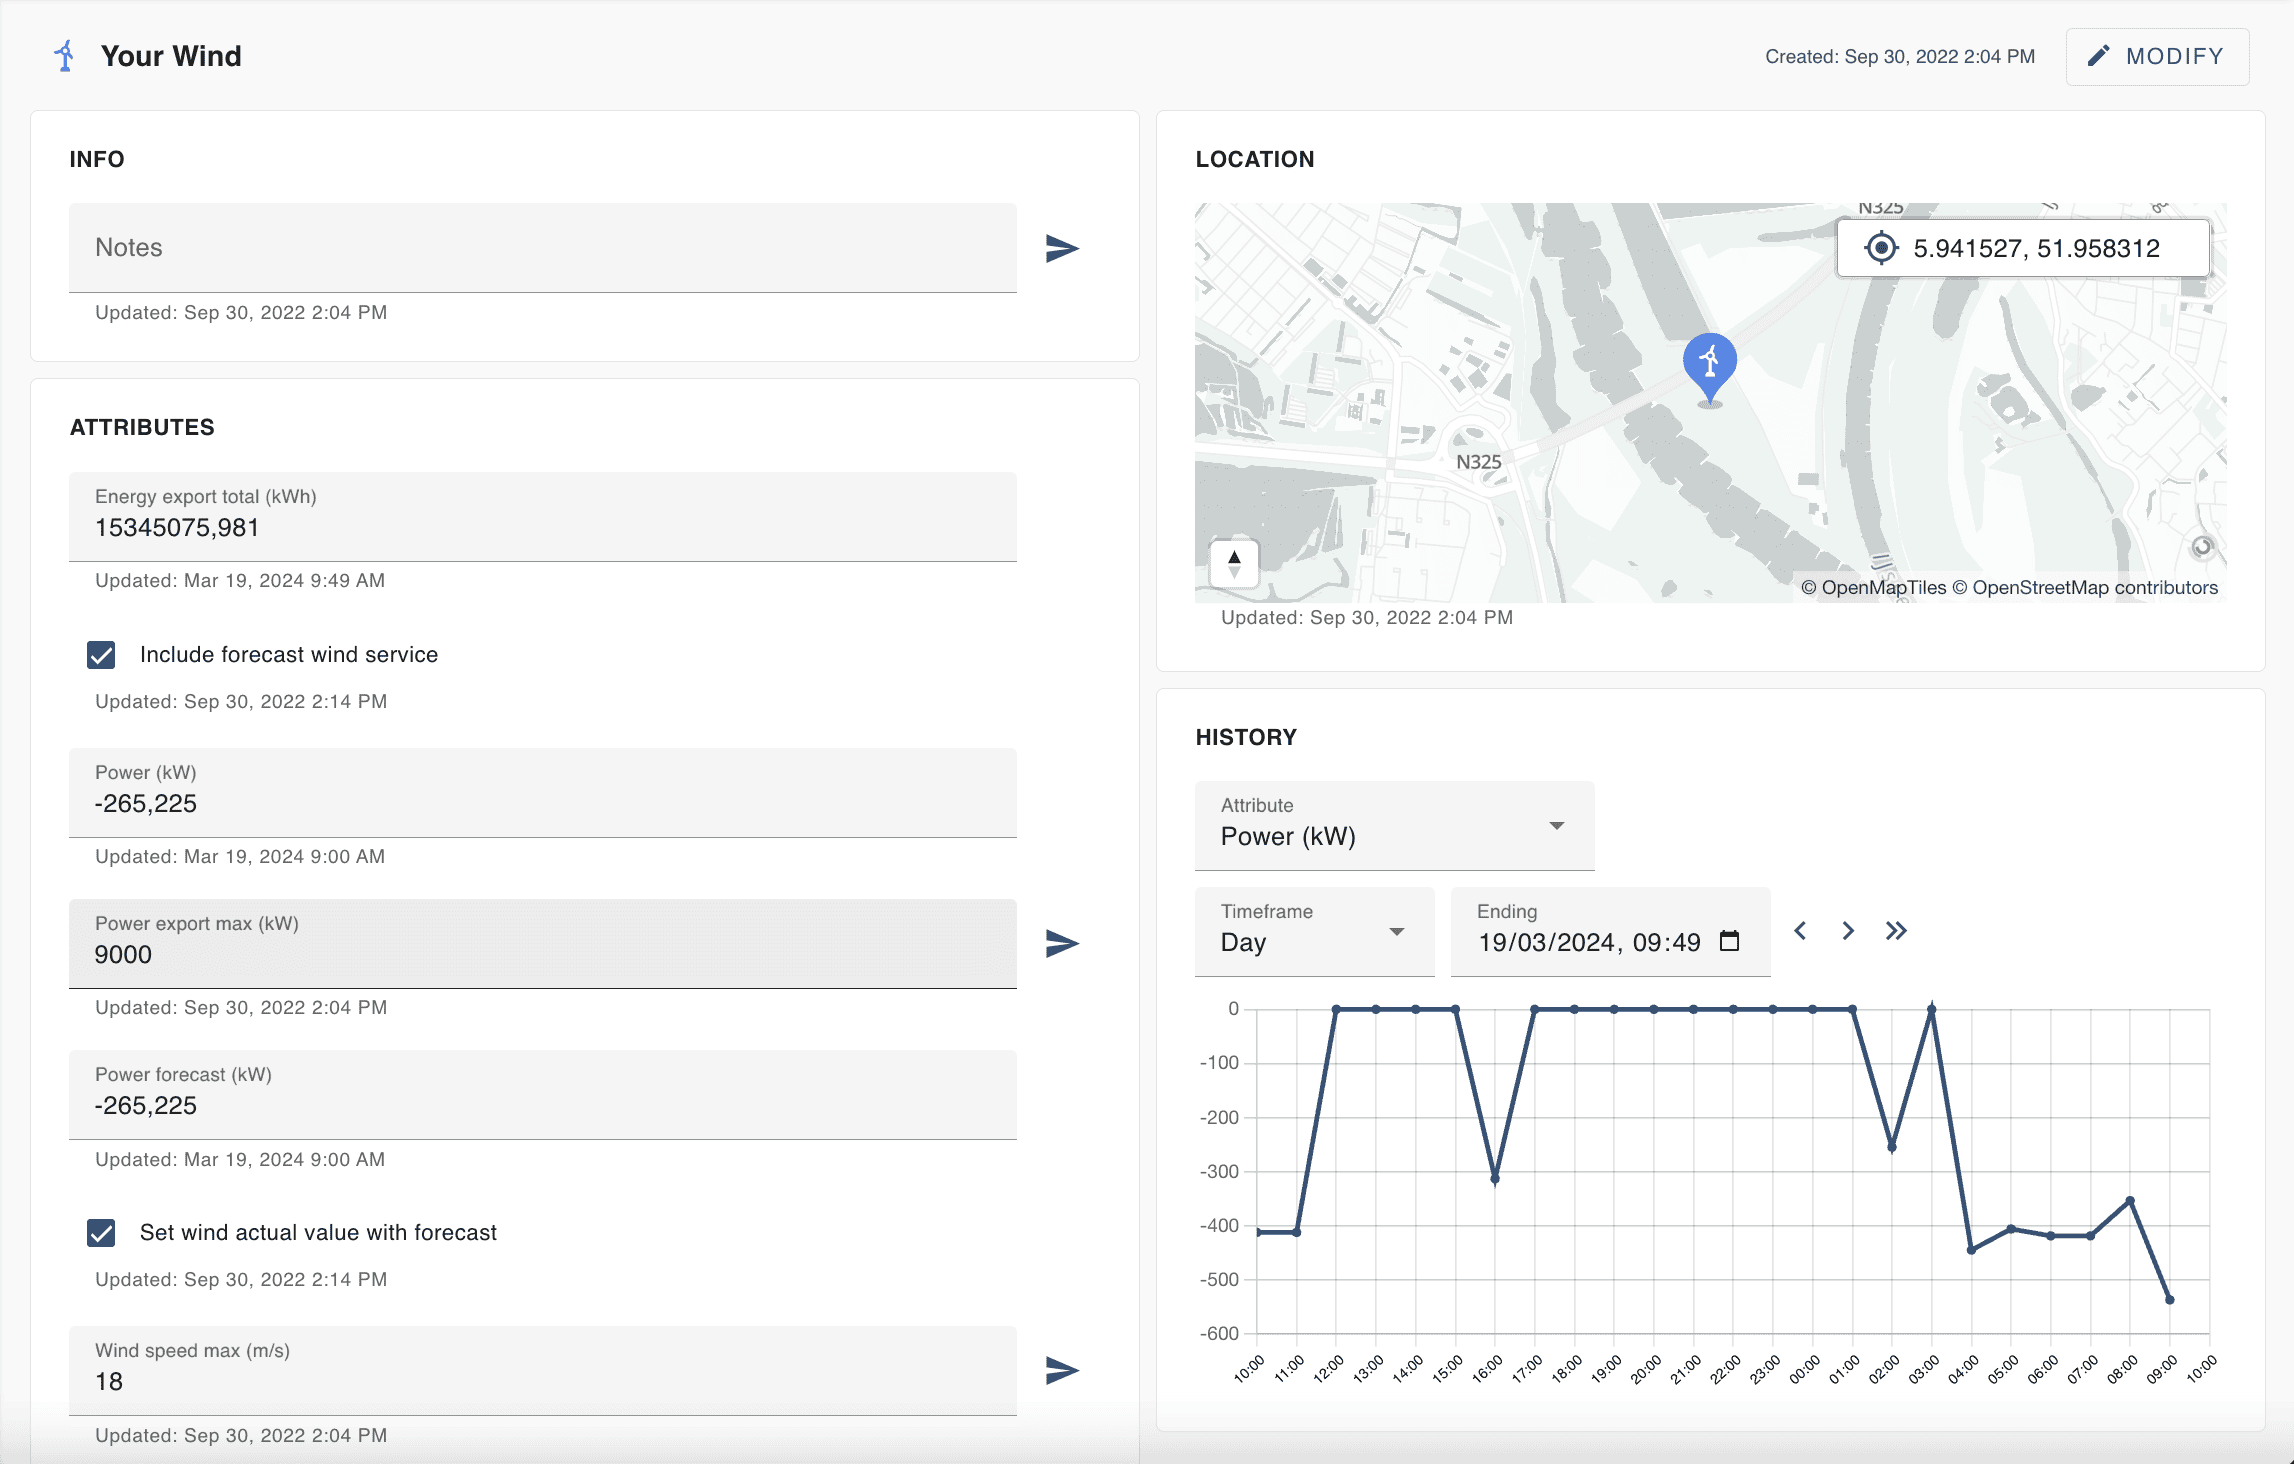 Figure 3. The Wind Turbine Asset (Your wind) with the respective attributes.
PV Solar Asset
To configure and connect your PV Solar asset to your own solar system you can use the Agents. Most importantly you need to connect the actual power (the attribute called power) and the energy meter value (the attribute called energy export total). In this example we connect a solar system from Solar Edge. First add an HTTP Agent and configure the Base URI and the Request Headers to connect to your Solar Edge system (see figure 4).
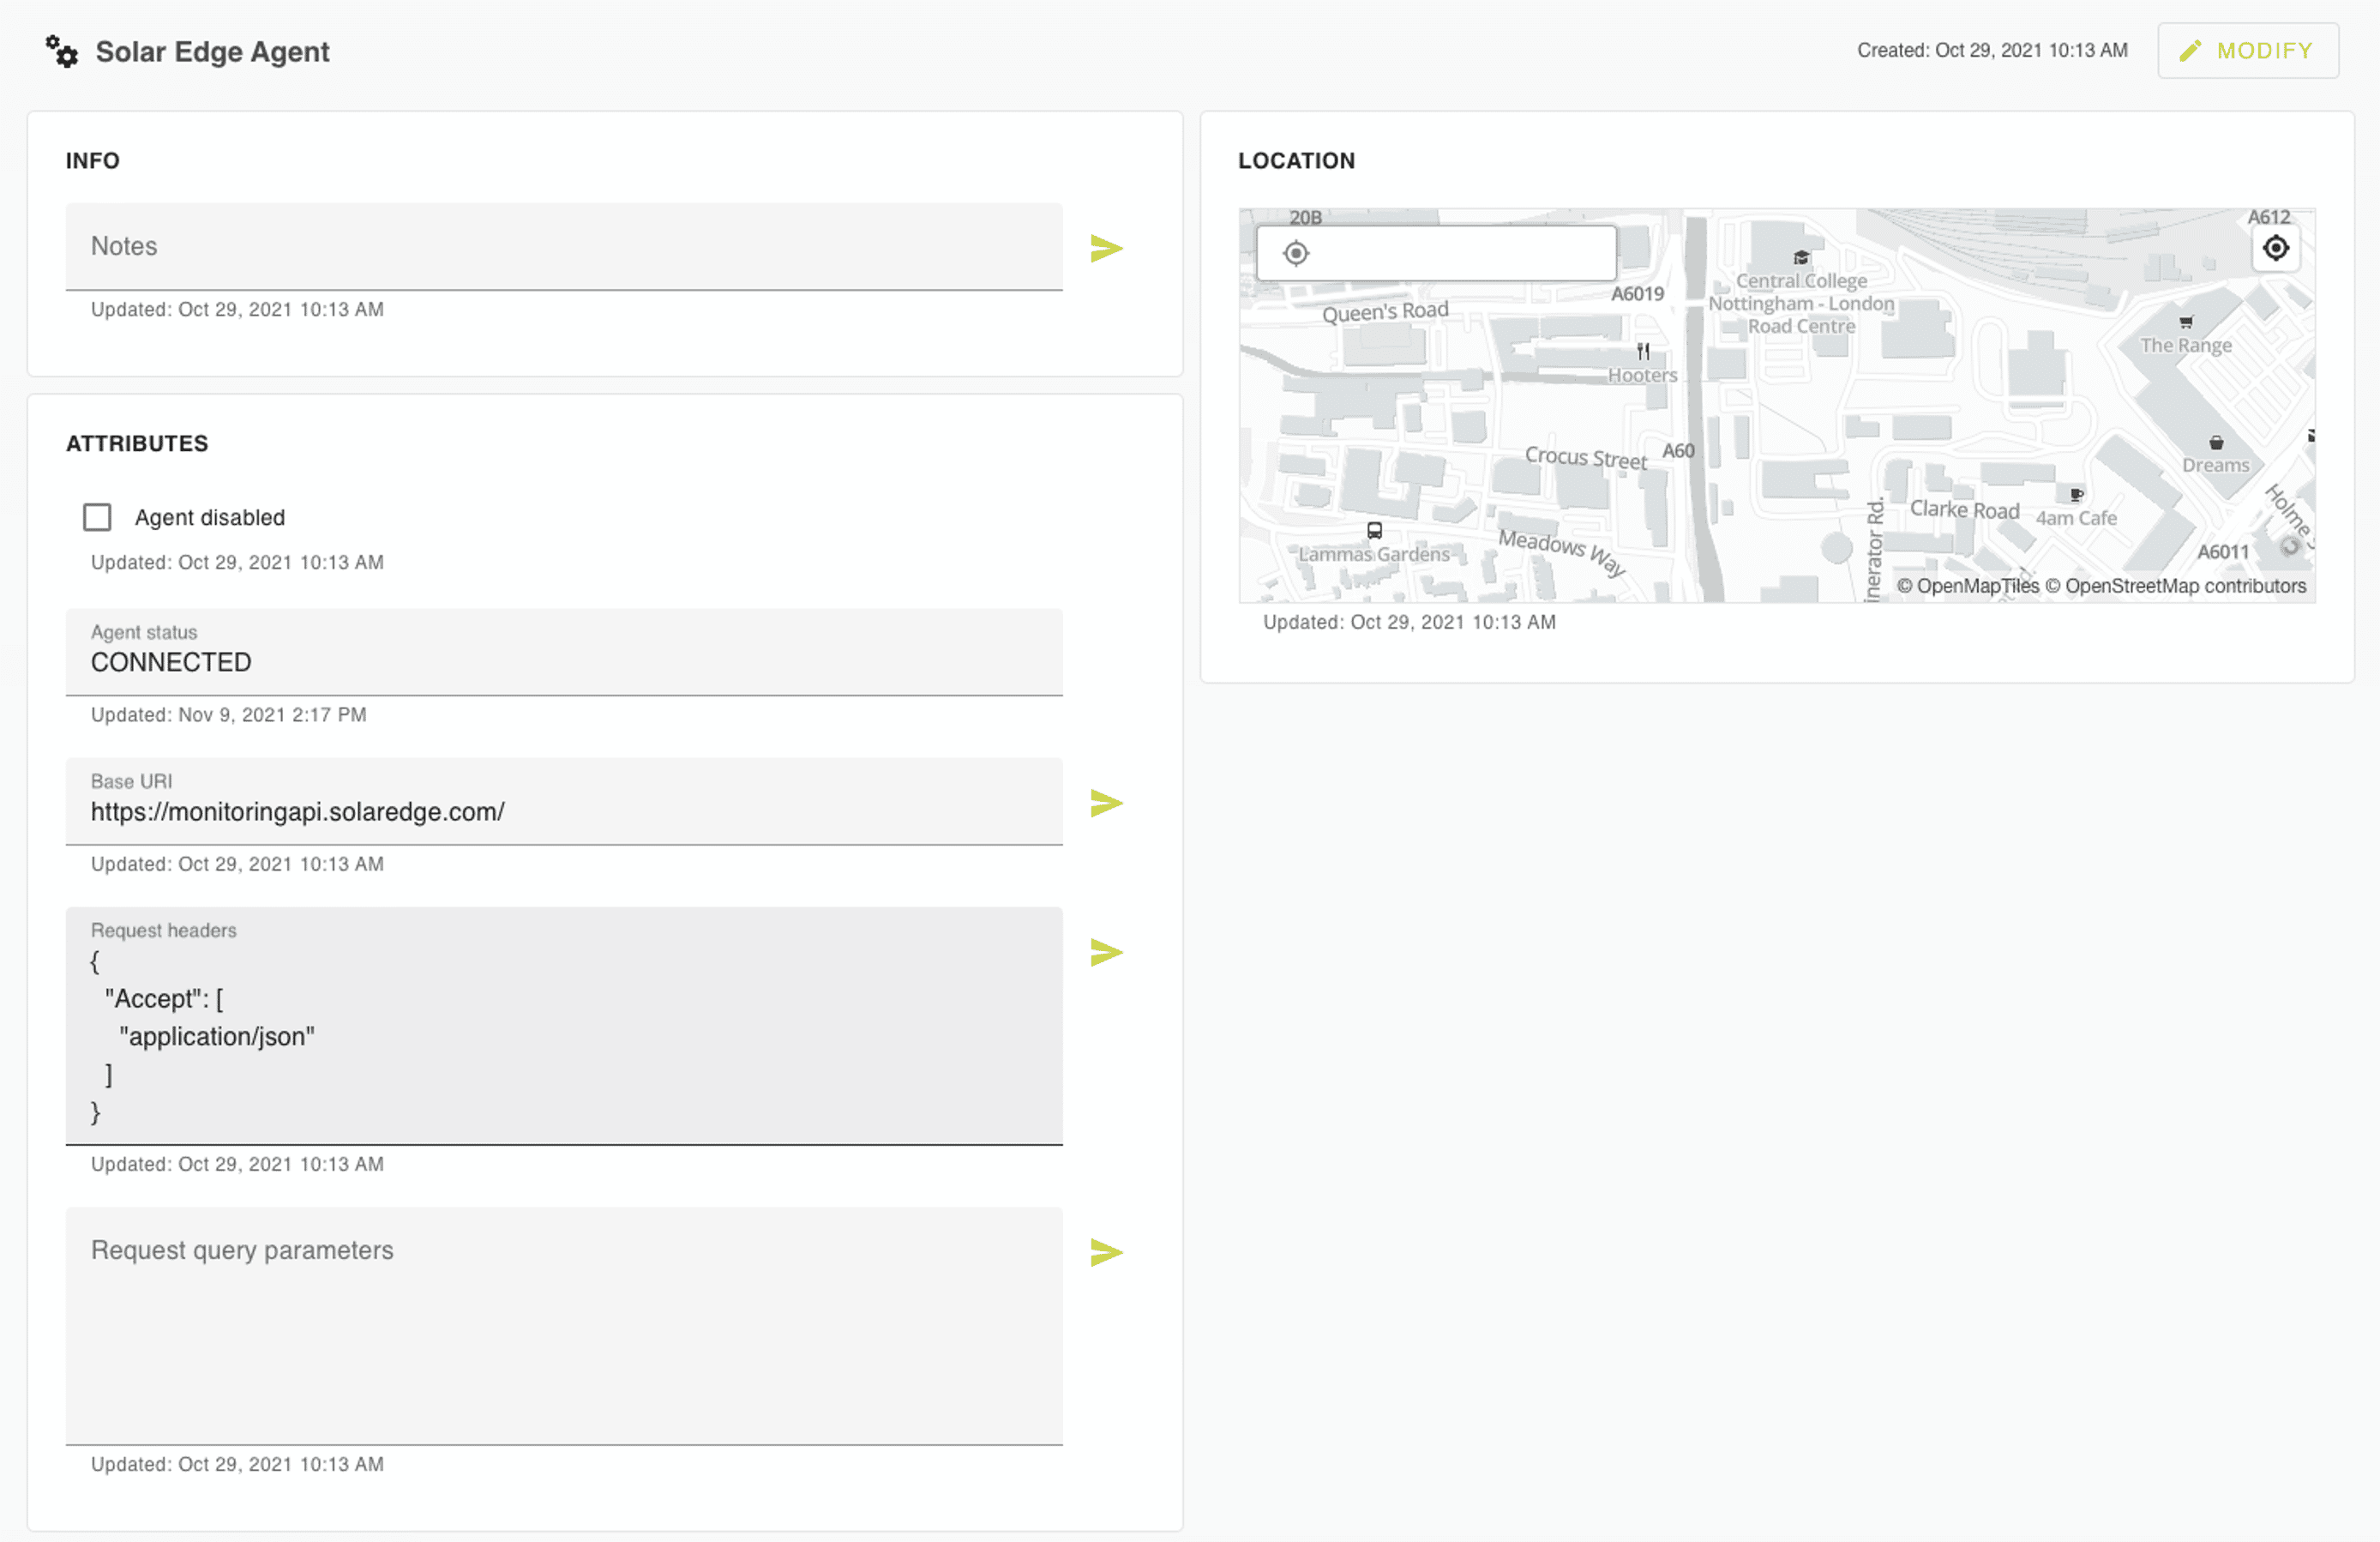 Figure 4. The HTTP Agent, configured to connect to Solar Edge.
Secondly, select your solar asset, select 'Modify' (on the upper right of the asset page) and connect the power attribute of the PV Solar Asset to this Agent. To do this uncollapse the power attribute, add the configuration item 'agent link', and add the required parameters (see figure 5). Also add the configuration items 'Rule state' (so you can use the attribute in rules) and 'Read only' (so you can't accidentally write a value in the 'VIEW' mode). Note the +/- sign convention, relevant for the optimisation to work: we use + for consumption and - for production. So in this case, as we are looking at power production, the power values should be negative. In a similar manner you can connect the 'Energy export total' attribute to the energy meter value.
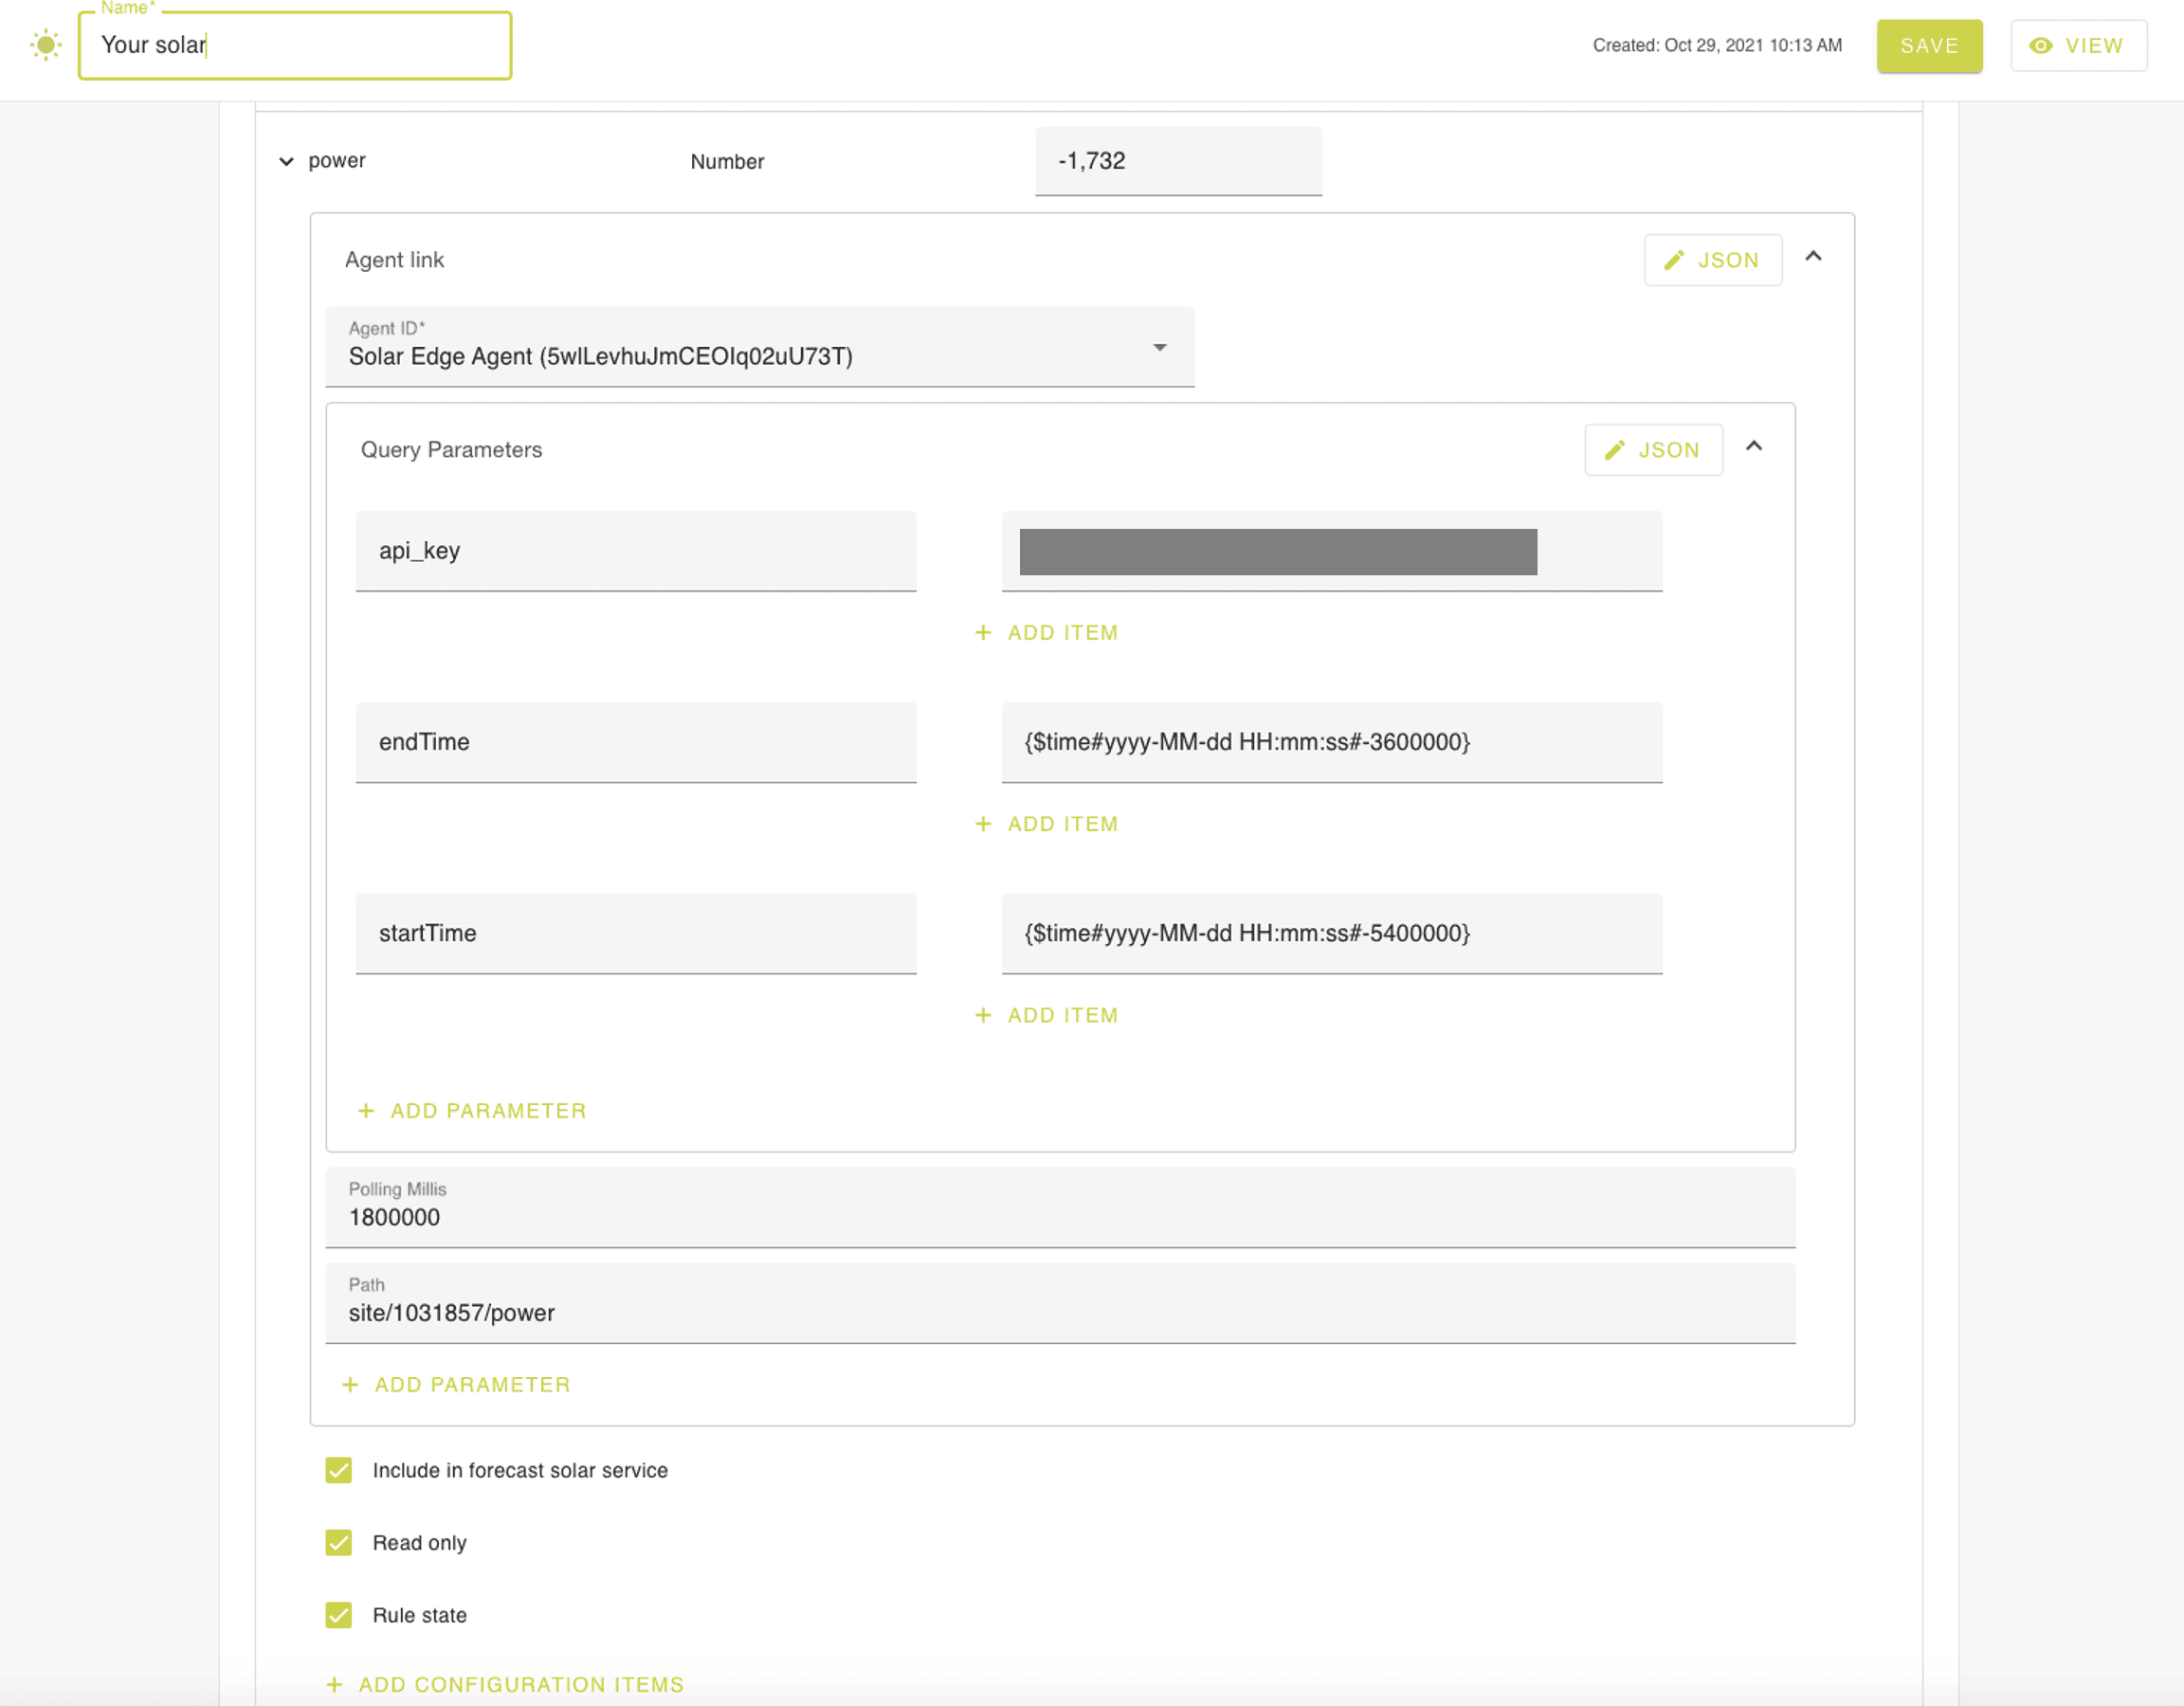 Figure 5. The connection of the power attribute in your solar asset, using 'Agent link'.
Forecast service
You also need the forecasted power for your solar system. Therefore, remember you need to have added the access key for the external 'forecast.solar' service earlier when setting up OpenRemote and customising it. You can register for a public free account to get the API key first.
To be able to forecast the solar power, you have to fill in the following attributes in your solar asset (see also Figure 2):
- Panel azimuth (South orientation or a perfect East-West orientation for an East-West panel orientation equals 0 degrees)
- Panel orientation ('SOUTH' means all panels are oriented in the same South direction; 'EAST WEST' means an East-West configuration)
- Panel pitch (horizontal is 0 degrees)
- Power export max (the installed peak capacity in kW)
- Location. You can do this in the 'MODIFY' mode by opening the map modal next to the location attribute and setting the location by long-pressing on the map.
Now you can turn on the attribute 'Include forecast solar service' on your solar asset. Once saved the forecast service is running. To see it in action you can go to the 'Insights' page and select the 'Power' attribute in a chart. The dotted line will represent the forecasted data.
If you also want to store the data for forecasted power to compare it with the actual values, take care you add the configuration items 'Has predicted data points', 'Read only', 'Rule state', and 'Store data points' for the attribute 'Power forecast'.
Another option is to turn on the attribute 'Set actual solar value with forecast'. This is convenient if you can't get live power data for your solar panels. The actual 'Power' will now also be set by the forecast.
Wind Turbine
Your wind turbine asset is configured in a similar manner. First connect the 'Power' (note the negative value) and 'Energy Total Export' to an Agent which connects to your wind turbine system. See the PV Solar Asset example above, or check the different Agent Protocol options in the documentation.
Forecast service
Similar as for the Solar asset, you need a forecast for the wind power as well. For the wind power forecast to work you need to have added the access key for the external 'OpenWeather' service earlier when setting up OpenRemote and customising it. You can register for a public free account to get the AppID key.
To be able to forecast the wind power, you have to fill in the following attributes in your wind turbine asset (see also Figure 3):
- Power export max (also called nominal or rated power in kW at the nominal or rated speed)
- Wind speed max (also called cut-off speed, the maximum speed at which a turbine is normally operating; above it will be turned down; in m/s)
- Wind speed min (also called cut-in speed, the minimum speed required to operate the wind turbine; in m/s)
- Wind speed reference (also called nominal or rated speed; in m/s)
- Location. You can do this in the 'MODIFY' mode by opening the map modal next to the location attribute and setting the location by double-clicking on the map.
Now you can turn on the attribute 'Include forecast wind service' on your wind turbine asset (see Figure 3). Once saved the forecast service is running. To see it in action you can go to the 'Insights' page and select the power attribute in a chart. The dotted line will represent the forecasted data.
If you also want to store the data for forecasted power to compare it with the actual values, take care you add the configuration items 'Has predicted data points', 'Read only', 'Rule state', and 'Store data points' for the attribute 'Power forecast'.
Another option is to turn on the attribute 'Set wind actual value with forecast'. This is convenient if you can't get live power data for your wind turbine. The actual 'Power' will now also be set by the forecast.
Electricity Consumer
To connect electricity consuming devices. You can connect several energy meters by an 'Electricity Consumer Asset', as child of the Optimisation Asset. Similar as before you should connect the 'Power' and 'Energy Total Import' to your meters by using any of the existing Agent Protocol options.
Forecast service
For the electricity consuming devices you also need the forecasted power. You can enable this in two ways. The simple one is by adding the configuration item 'Forecast'. This service will take an exponential weighted moving average, based on your preferences. See Time series forecasting for configuration. For more advanced forecasting you can use the ML forecasting service, which can take into account the influence of other attributes, e.g. weather. See ML Forecasting.
Electricity Battery
One of the devices the optimisation can actively control is a static battery. You can add an 'Electricity Battery Asset' as child of the Optimisation Asset, and again link it up with an API of your battery system using any of the existing Agent Protocol options. To make the optimisation work, you will need to link at least the following attributes:
- Energy level
- Power setpoint
Turn on the attributes 'Supports import' and 'Supports export'. This is an indication for the optimisation that it's allowed to control the power setpoint, both for charging and discharging.
Battery Simulator
If you don't have a battery but want to simulate it and see what you can achieve in terms of financial or carbon savings, you can use the 'Storage Simulator Agent'. In this tutorial we use that option.
Add the 'Storage Simulator Agent' first. Then add the configuration item 'Agent link' and link to the 'Storage Simulator Agent', for six attributes:
- Energy level
- Energy level percentage
- Power
- Power setpoint
- Energy import total
- Energy export total
Also set the specifications of the battery by filling in values for the following attributes:
- Energy capacity
- Power export max
- Power export min
- Energy level percentage max
- Energy level percentage min
Electric Vehicle and a Charger
The charging of vehicles requires at least an 'Electric vehicle asset', as child of the Optimisation Asset. Optionally you will also add a 'Electric charger asset'.
First let us explain how the optimisation will treat a vehicle. The optimisation will see the battery of the vehicle as a regular storage device which it can charge, and in some cases discharge. In addition you can set an 'Energy level schedule' on the vehicle (this is an optional attribute) to safeguard that your vehicle battery has enough energy at the time you need it.
So to make the optimisation work the following attributes need to be connected for the Electric vehicle asset, using any of the existing Agent Protocol options:
- Energy level
- Power setpoint
There is a series of attributes on the vehicle you need or can use to make the optimisation work. We'll discuss them one-by-one:
- Supports import, required for the optimisation to actively control the setpoint power for charging
- Supports export, required for the optimisation to actively control the setpoint power for discharging. Only to be set when the vehicle and charger support discharging of course.
- Power import max, required to set the maximum charge power the vehicle can handle
- Power export max, required to set the maximum discharge power the vehicle can handle
- Energy level schedule. This sets the hour of the day, for each day of the week, at which the battery needs to be charged at the indicated percentage (see figure 6). It is not required but prevents an empty battery while you need your car to drive somewhere!
- Energy level percentage max. The optimisation will never charge beyond. Without setting it, it will assume 100%
- Energy level percentage min. If a vehicle gets connected with a lower level, it will immediately start charging until it reaches the minimum level. If not set it will assume 0%.
In some cases you also want to connect to your charger, and make the vehicle a child of the charger, e.g.:
- In case you can't control the power setpoint on your vehicle. You will need to link the 'Power setpoint' of your charger to your charging system, using any of the existing Agent Protocol options. In addition you can use the 'Flow editor' to link the 'Power setpoint' of your vehicle to the 'Power setpoint' of your charger. The optimisation will now set the 'Power setpoint' of your vehicle, which will then be forwarded to the 'Power setpoint' of your charger.
- In case you want the optimisation to consider both the 'Power import max' of your charger as well of the vehicle, to take the lowest of the two for the 'Power setpoint'.

Figure 6. The Energy schedule is in a JSON format as shown. Each day of the week (seven days) specifies the required energy level percentage for each hour of the day, starting at midnight. So in the above example the vehicle battery needs to be charged to 90% at 8am on each day
Electricity Supplier
The optimisation will also take into account the 'Tariff import' and 'Tariff export' for your electricity. To enable this, first add an 'Electricity supplier asset' as a child of the Optimisation asset. Note that the tariffs are defined as costs. So the 'Tariff import' is normally positive as you pay, while the 'Tariff export' is negative as you earn. You can either set a fixed value for both tariffs, or connect to an API of your supplier, using any of the existing Agent Protocol options. For electricity tariffs you can e.g. use EPEX Spot prices via the ENTSOE API https://transparency.entsoe.eu/ (for optimising on carbon footprint you can consider https://www.electricitymaps.com/ , see 'Optimisation' for a further explanation).
In this tutorial we just simulate values by adding a simulator profile. To do that, take the following steps:
- Add a 'Simulator Agent' at the root of your asset tree.
- For both the 'Tariff export' and 'Tariff import', add the configuration parameter 'Agent link'.
- In the 'Agent link' select the 'Simulator Agent'
- Add the Parameter 'Replay Data' to 'Agent link' (see figure 7)
- Fill in the prices you want to use per time stamp. Note these are costs, so usually positive for import tariffs and negative for export tariffs (see figure 8 for an example).
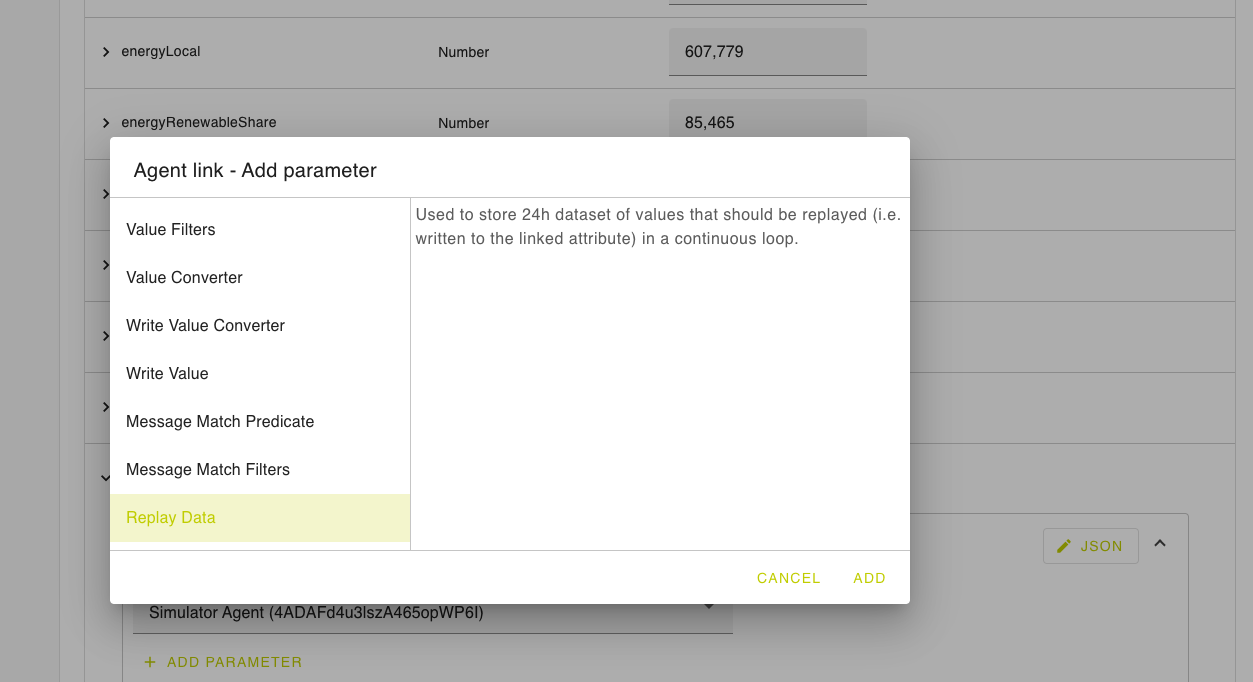
Figure 7. Selecting the parameter 'Replay data' within the 'Agent link' configuration item

Figure 8. An example for the 'Replay data' for the Export tariff you want to use, indicating a tariff per timestamp (seconds). The negative value indicates you are earning money
Forecast service with ML forecasting
In case you need forecasted electricity tariffs beyond the time window of the published data by EPEX, you can use the ML forecasting service, which can take into account the historical time series data as well as the influence of forecasted wind speed and solar/cloud coverage. See ML Forecasting and the Open WeatherMap Agent.
Optimisation
The asset tree of the EMS you have build should now look like the one in figure 9. The optimisation routine can be configured in the optimisation asset:
- Financial weighting (between 0 and 100%). This indicates whether you are optimising on costs and or carbon. We have only explained the agile financial cost tariffs for the supplier, so set this value at 100%. In a similar manner, using carbon tariffs (an optional attribute of the Supplier asset) you can optimise on carbon by setting the 'Financial weighting at 0'.
- Interval size (the interval at which the optimisation runs again, in hours)
- Optimisation disabled (an on/off). This attribute can only be changed in the 'MODIFY' mode, to (temporarily) disable optimisation.
You have now set everything to run your optimisation. Once optimisation is enabled the optimisation will control and schedule all 'Power setpoints' of assets which have the 'Support import' and/or 'Support export' enabled. It will make the following considerations:
- Take into account the net resulting power towards the grid (export) or from the grid (import) as the difference between export and import tariffs influence the resulting costs.
- Take into account the forecasted power, both for electricity consumers and producers, to forecast when there is a net surplus towards the grid or a net shortage of electricity.
- Take into account the future export tariffs, as it is preferred to charge batteries or vehicles at the time of lowest export tariffs. At that time you would be earning the least by selling, so better store energy.
- Take into account the future import tariffs, as it is preferred to discharge batteries or vehicles at the time of highest import tariffs. You would pay the highest tariffs if you buy electricity, so better use your stored energy.
- Take the Energy level schedule of your vehicle into consideration as well as their Energy level percentage min, and always take care that the energy levels are met in time.
- Prioritise the different batteries, in this case your static battery and your vehicle, based on the so called Levelised cost of Storage (LCOS). LCOS is the additional costs of charging or discharging a battery. It reflects the costs of your battery divided by the capacity times the maximum number of charging cycles, so representing an amortisation. This can be implemented by adding the optional attributes 'Tariff import' and 'Tariff export' to your Electric vehicle asset and your Battery. Note that you should keep the 'Tariff import' value for your vehicle at '0' as charging your vehicle is anyhow required to be able to drive, and the optimisation will not introduce extra charge cycles. We haven't included this in our tutorial and recommend to read-up expert articles before applying.
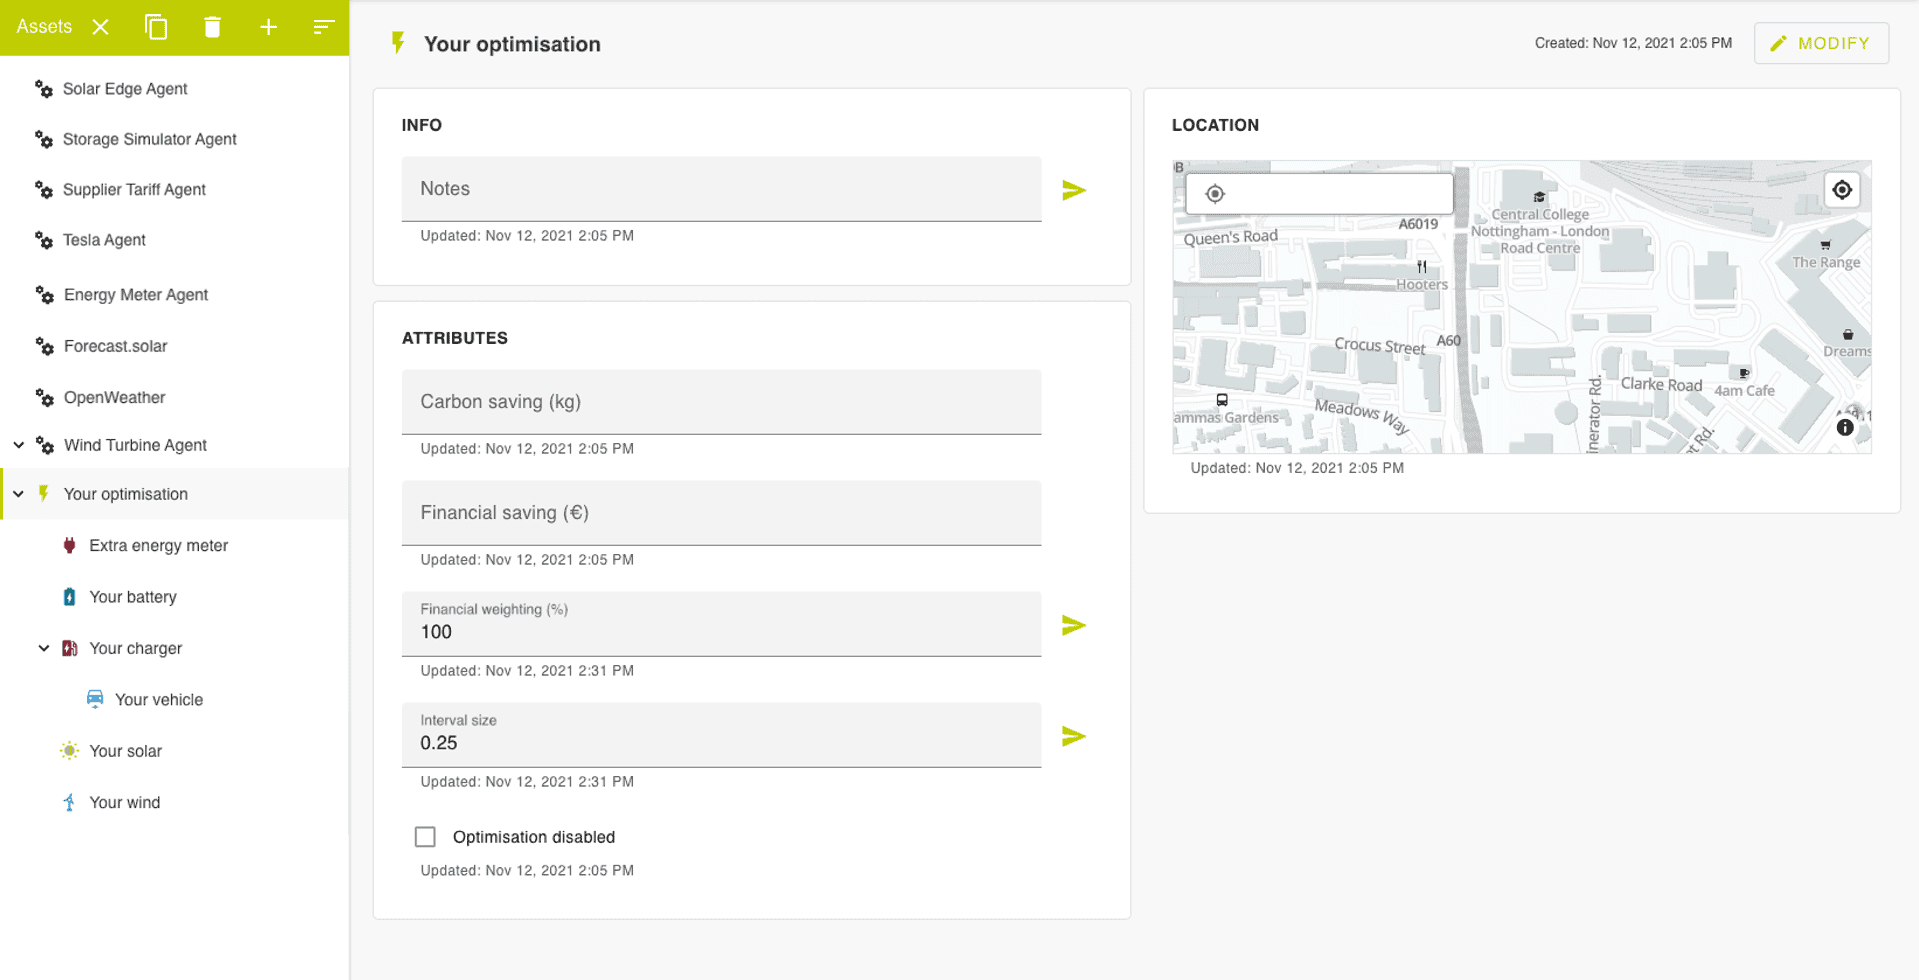
Figure 9. The asset tree of your EMS on the left, with the Optimisation asset selected. Note that the Electricity Supplier is not shown but also needs to be added (for adding the dynamic tariffs)
Financial and carbon savings
So now you have your EMS running. The last item to explain are the two attributes 'Financial saving' and 'Carbon saving'. These two values are reflecting the EXTRA savings you are achieving due to the optimisation using the static battery in a smart way and schedule the charging of your vehicle at the best time. To know your electricity bill you should of course count up the total imported energy times the import tariff, and the total exported energy times the export tariff...
DISCLAIMER: OPENREMOTE SHALL UNDER NO CIRCUMSTANCE BE LIABLE FOR ANY DAMAGES ARISING OUT OF ILLEGALLY USING UNOFFICIAL, NOT VENDOR AGREED OR APPROVED, API'S