Auto provisioning devices and users
OpenRemote offers functionality for automatic client and asset provisioning. If you build and distribute your own hardware devices, you can use this mechanism to have your devices automatically register and connect to OpenRemote.
When the auto provisioning is configured, an authorised device will first create a service user in OpenRemote, if it not already exists. Secondly it will create an asset in the specified OpenRemote Realm, with the attributes, using the 'Asset template'. Based on the 'Roles' the device can now communicate with this asset.
Terminology
- Client: Refers to the initiator in communication with OpenRemote; the same meaning as in authentication terminology.
- Asset: Any asset within the OpenRemote system.
- Provisioning: Creation within the OpenRemote system.
Provisioning Type
There are two basic mechanisms for client provisioning.
X.509 Client Certificate
Supports the industry standard X.509 certificate authentication mechanism where each client has a unique client certificate that is signed by a CA certificate that must also be registered within OpenRemote, the certificate must contain a unique ID within the CN attribute of the certificate. OpenRemote then verifies the certificate and CN attribute presented during provisioning.
This is the most secure authentication mechanism but adds complexity to the manufacturing/flashing process.
Symmetric Key (HMAC-SHA256)
NOT YET IMPLEMENTED
Uses a shared secret for authentication; HMAC protects the integrity and authenticity of the encrypted message; the HMAC is generated from a unique client ID and the shared secret; OpenRemote then verifies the HMAC based on the unique ID presented during provisioning.
This mechanism is less secure especially if the shared secret is stored in an accessible way on the client device; using a HSM (Hardware Security Module) protects against this; also pre-generating the client HMAC and loading this onto the client device before provisioning means the secret does not need to be shared, but once again complicates the manufacturing process.
TL;DR
Jump to:
Implementation
Connect flow
The following illustrates the connect process (through MQTT topics) which clients can use to auto provision a service user and optionally an asset whose ID is generated using a UNIQUE_ID provided by the client; the client is then authenticated and the asset is then returned to the client.
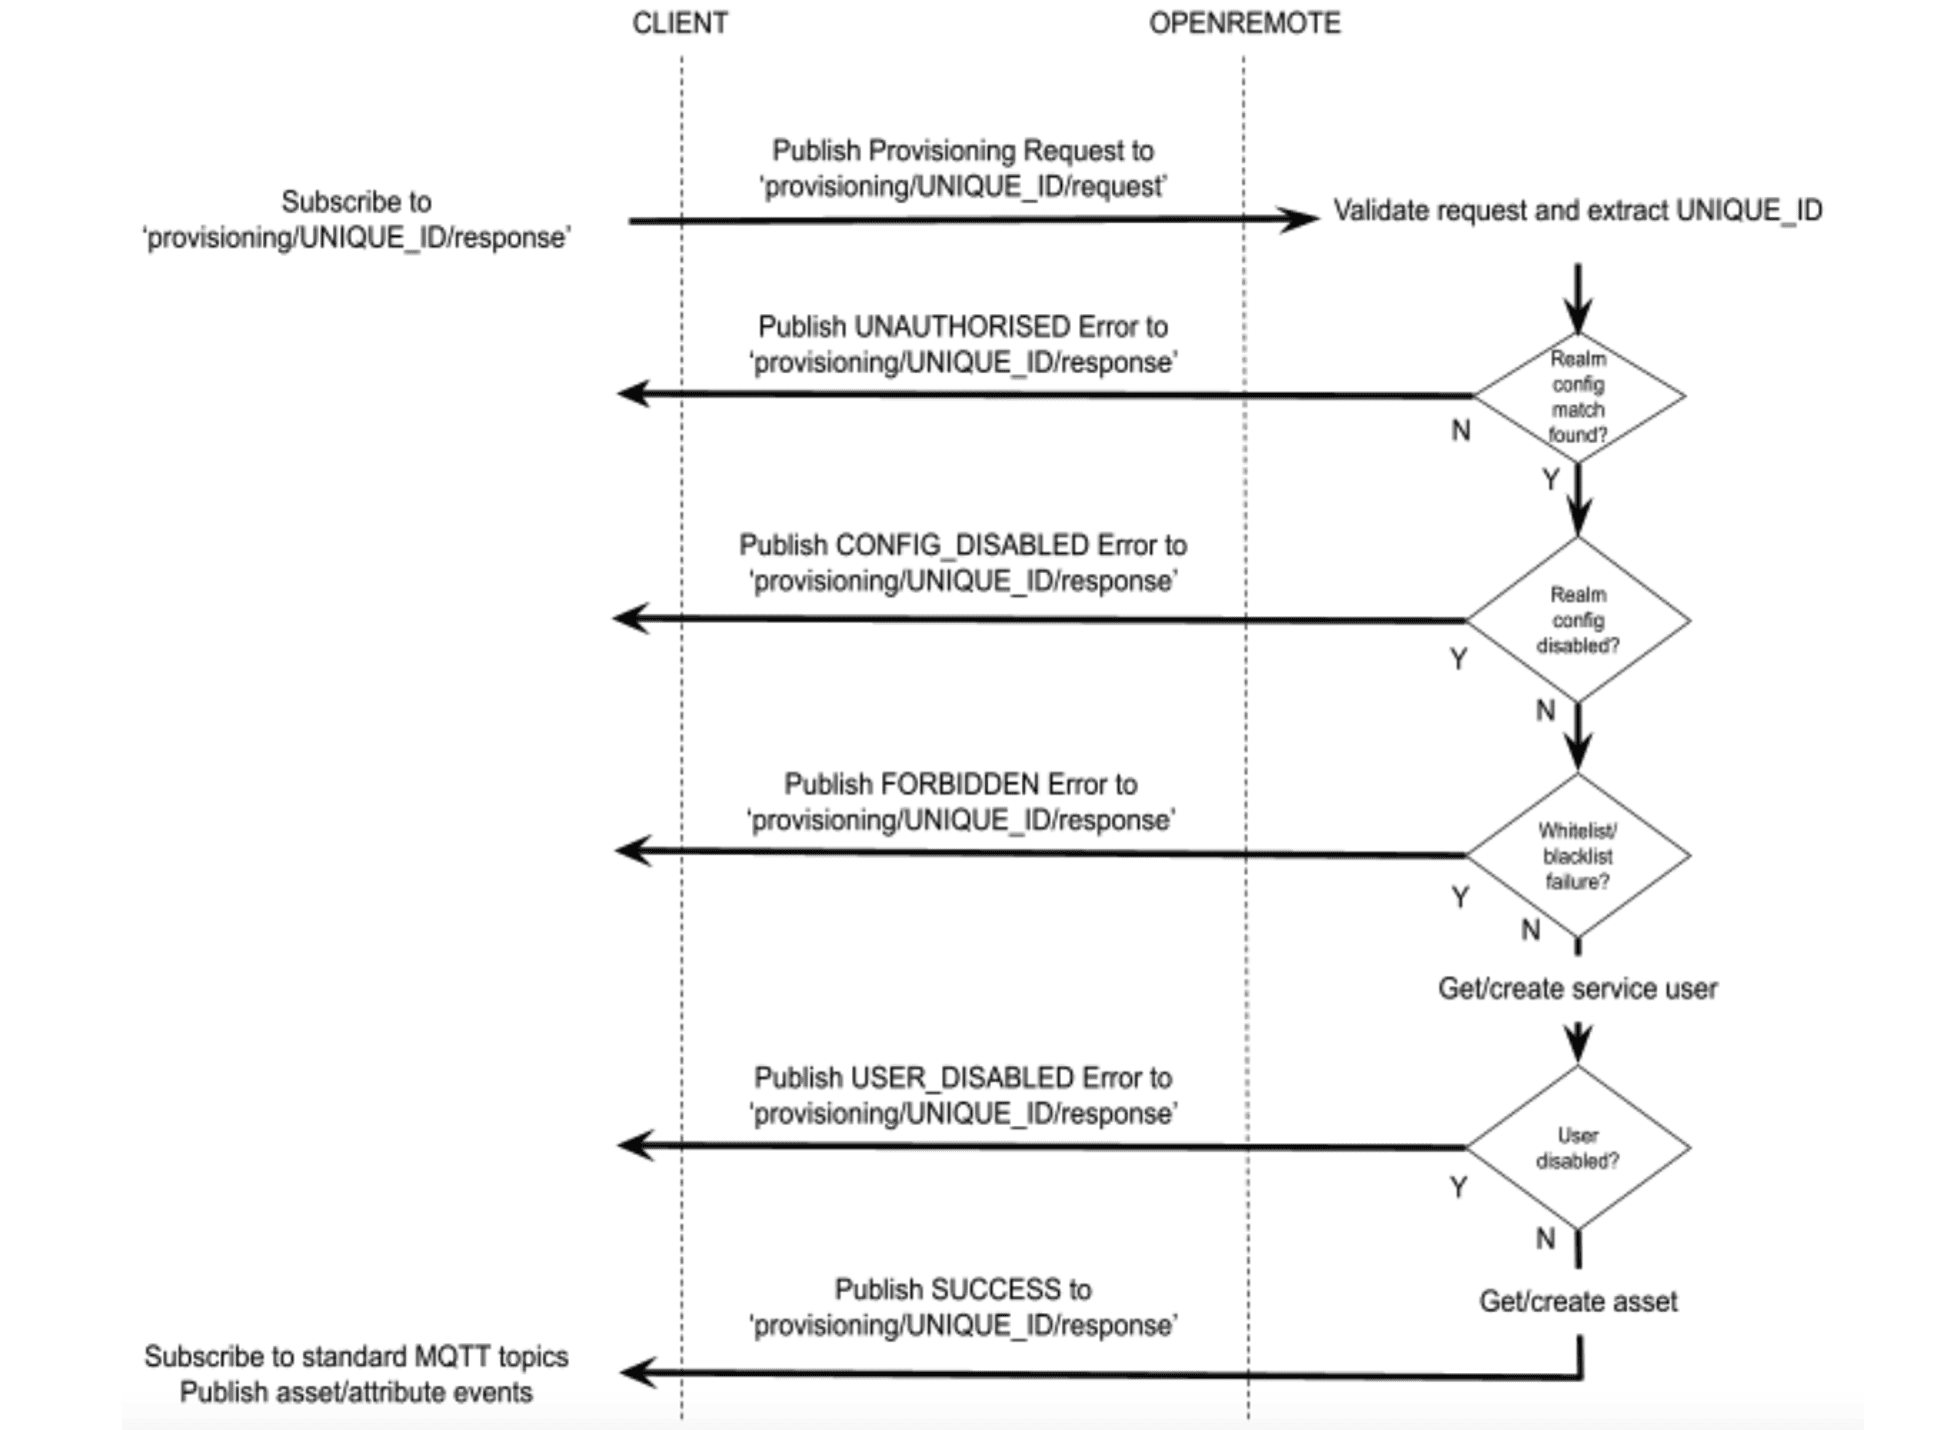
NOTE THAT THE 'WHITELIST/BLACKLIST FAILURE', IS NOT YET IMPLEMENTED. THIS FUNCTION ENHANCES SECURITY AS ONLY SPECIFIED DEVICES CAN CONNECT (WHITELIST) OR CAN BE EXCLUDED (BLACKLIST)
X.509 Client Certificate Validation
- Find X.509 realm config whose CA cert subject matches the client cert issuer
- Check client certificate has been signed by the CA
- Extract client certificate subject ‘CN’ value
- Check it matches UNIQUE_ID
Symmetric Key Validation
NOT YET IMPLEMENTED
- Regenerate HMAC using shared secret and UNIQUE_ID and check it matches
- Find realm config match where HMAC generated using secret matches
Message Schema
X.509 Provisioning Request Message
The provisioning message format for X.509 is as follows:
    {
      "type": "x509",
      "cert": "..."
    }
The cert field should be in PEM format and must contain the certificate chain up to and including the CA certificate registered within OpenRemote.
Symmetric Key Provisioning Request Message
NOT YET IMPLEMENTED
The provisioning message format for HMAC is as follows:
    {
      "type": "hmac-sha256",
      "code": "..."
    }
The code field should be the base64 encoded HMAC specific to this client.
Success Response Message
    {
      "type": "success",
      "realm": "REALM_NAME",
      "asset": {...}
    }
Error Response Message
    {
      "type": "error",
      "error": "ERROR_TYPE"
    }
Error Type
- MESSAGE_INVALID - Failed to parse the request message
- CERTIFICATE_INVALID - The X.509 certificate is not valid
- UNAUTHORIZED - No matching config found
- FORBIDDEN - Unique ID fails whitelist/blacklist
- UNIQUE_ID_MISMATCH - Unique ID used in subscription does not match credentials
- CONFIG_DISABLED - Matched realm config is marked as disabled
- USER_DISABLED - Service user previously provisioned has been disabled
- SERVER_ERROR - Unknown exception occurred during processing
- ASSET_ERROR - Asset previously provisioned is not in the same realm as the matched realm config
Certificate Generation
Client certificate generation is done using standard tooling e.g. openssl:
- A unique client private key and X.509 certificate should be generated with the client’s unique ID stored in the CN attribute of the certificate.
- The certificate should then be signed by an intermediate CA (can be self-signed or signed by a CA)
- The intermediate CA certificate is then uploaded into OpenRemote within a Realm config instance
When the client publishes its certificate to OpenRemote it must be in the PEM format. Client certificate generation can take place within the manufacturing environment without any external dependencies.
The security of the CA private key(s) is essential, if compromised then the certificate can be marked as revoked within OpenRemote and this will require all client certificates signed by this compromised CA certificate to be replaced at considerable effort.
Some useful commands:
Generate self-signed CA cert (inc. key):
openssl req -x509 -sha256 -nodes -newkey rsa:4096 -keyout ca.key -days 730 -out ca.pem
Generate CSR for device (inc. key):
openssl req -nodes --newkey rsa:4096 -keyout deviceN.key -subj "/C=NL/ST=North Brabant/O=OpenRemote/CN=deviceN" -out deviceN.csr
Generate signed cert for device:
openssl x509 -req -in deviceN.csr -CA ca.pem -CAkey ca.key -CAcreateserial -out deviceN.pem -days 500 -sha256
Asset provisioning
When a client (device) successfully authenticates it is possible to auto provision an asset that can represent the client within OpenRemote; this is done by providing an asset template (an asset in JSON representation) that will be hydrated, stored and returned to the client within the success message payload. The ID of the created asset is derived from the UNIQUE_ID so on future authentications the previously created asset can be found and just returned rather than re-created. The following placeholder can be used in the asset template to allow for automatic substitution of the authenticated client's UNIQUE_ID:
%UNIQUE_ID%
The type of the asset generated must be an asset type that exists in the system; otherwise the creation will fail and client authentication will also fail. The asset template must contain all the attributes and configuration (meta) items that you want to be present on the created asset.
Configuration
Configuration of auto provisioning is done via the Manager UI -> Auto Provisioning (top right menu); the menu item is only present for superusers.
Provisioning Configuration
Provisioning Configurations are used to allow configuration of the above via the Manager UI; a realm can contain any number of Provisioning Configuration items.
If a client matches more than one provisioning configuration there is no guarantee which one will be used.
A provisioning configuration contains the following data:
- Name - Label to be assigned to this provisioning configuration for identification [REQUIRED]
- Type - The authentication mechanism to use (currently only
X.509supported) [REQUIRED] - Realm - The realm that the provisioning config applies to [REQUIRED]
- Roles - The roles to apply to each auto provisioned service user (default:
none) [OPTIONAL] - Create restricted user - Should the auto provisioned service user be made restricted (default:
false) [OPTIONAL] - Disabled - Is this provisioning config disabled (no clients will be able to authenticate through it whilst disabled) (default:
false) [OPTIONAL] - Asset template - If specified an instance of this asset will be auto provisioned upon successful authentication; only provisioned if an asset matching the client's
UNIQUE_IDdoes not already exist (default:none) [OPTIONAL]
Example Asset template (see below for more information about obtaining an asset template)
{}
The following data is specific to the X.509 mechanism:
- Ignore expiry date - Optionally ignore client certificates that have expired; they must still have been signed by the CA certificate (default:
false) [OPTIONAL] - CA certificate (PEM) - The signing authority CA certificate that must match the CA certificate used to sign each client's certificate and must be in PEM format DO NOT PUT PRIVATE KEY IN HERE [REQUIRED]
Example PEM CA certificate
-----BEGIN CERTIFICATE-----
MIIF/TCCA+WgAwIBAgIUZ/o8/s1N8dM2kn3jqrzMfoF+/SMwDQYJKoZIhvcNAQEL
BQAwgYwxCzAJBgNVBAYTAk5MMRYwFAYDVQQIDA1Ob3J0aCBCcmFiYW50MRIwEAYD
VQQHDAlFaW5kaG92ZW4xEzARBgNVBAoMCk9wZW5SZW1vdGUxFjAUBgNVBAMMDW9w
ZW5yZW1vdGUuaW8xJDAiBgkqhkiG9w0BCQEWFXN1cHBvcnRAb3BlbnJlbW90ZS5p
bzAgFw0yMTEwMjgxMTA5MjJaGA8yMDcxMDIwODExMDkyMlowgYwxCzAJBgNVBAYT
Ak5MMRYwFAYDVQQIDA1Ob3J0aCBCcmFiYW50MRIwEAYDVQQHDAlFaW5kaG92ZW4x
EzARBgNVBAoMCk9wZW5SZW1vdGUxFjAUBgNVBAMMDW9wZW5yZW1vdGUuaW8xJDAi
BgkqhkiG9w0BCQEWFXN1cHBvcnRAb3BlbnJlbW90ZS5pbzCCAiIwDQYJKoZIhvcN
AQEBBQADggIPADCCAgoCggIBALYNz5ZWMpFu+2K1kNep34Keh2clknA7Rm3Wke7p
HoTpjddqHNvQSVjSOB7CZA1E5+a8O7mU6kvnE3wed/h+DO3cQWihbYTw9lNr9+2M
LS8+jny+lDeuXOMXxcb3og4Cn88mfPihdsUkmI/i7Hk3oSjonyLPycMW/M3d1S6L
6YkgrdkA3jbMtaR9epcCv/g1P9WBKzF05qIs1lVEzGXOyF2Km2rPAdUcUjFplBbE
DyUgzbAYsdUTz0PCvAFi1y82/xreWeZQ8OlW1TnqMOR0elVDf/d8An+a3LV/uSaB
ihmdS4yvxcqZNGU+ShbBO6P+8JjLQNDmPQgjEURCYT4NyHRBChJr31CCvV2QJ2Ik
Hn5by9/KvvnZ/5y3KjYht9V3ooD0ptxIVKhhwuNFeDSC9Pnqr2QL+mawlWq+Wq/q
/PMN034gTqLkYAsm4ltoQj/L0ebRdQ0t9L9FML4+fDtEOWAUz3/vRcN1J2y5dNjZ
Y4H+bTAemGXpD3kz0VyhKWdPGQZgAMJ6gEHHzY4Ooi3UsLXt53knmLjkG3jo6g/Y
WJOiWcn7TlRRj9Pjmj+aTx1/9o8+3MnEm0THAUX1zN5IUfU1OnpcHWee2QbUlaTu
dYYYZQ+dCJImSWgp48FMFwPXLibF/xsAfYAIhw9isfQSe0JmUBv41MsOyzHJBYsA
H29NAgMBAAGjUzBRMB0GA1UdDgQWBBQnxsJQgUOdmW/iSvTJ67WtpHe8ojAfBgNV
HSMEGDAWgBQnxsJQgUOdmW/iSvTJ67WtpHe8ojAPBgNVHRMBAf8EBTADAQH/MA0G
CSqGSIb3DQEBCwUAA4ICAQBIbKYJDzEWn6yP44t3BYLb/1XIW/f+LUCNDIdlXKco
sxcMddWHNLFTC05fd/HKaUWBGEMBpuV2EjZHCxX8b3g5yhEMy2gU3BaMel777vcg
EG7c82+kOzuunuH7vUTi4NhTFko/iIgqlIbQYF/8oWnFH7tn5PMhaiGEMMEOCf1Y
fKedTGM+Or4e/ptddWroucqw9wzIZ9Wi/YYsLxwpdew2Eay7OZhY8qnH5rvkiUjG
SgkSmxyN3F+EZQj00G15yVmFpJ1bhLT4s9a33gqcMUon0eHVlGpLcF/0vxVvZ5zr
UUPb1MKUhxSqpFC7h+2odlDwtfepCCTAvpnqiI794ewvkblcafJ5lbypNUjTSXBA
+Fi1BcJteEBCVGOOLs34bquAtNdPEmc37wZA+5QNdz9WnYLCgvnrPh8VEXTdqqqb
Mf4/Rr0GbUOmRZXk0LordT3IwOq67c2HrbTFD5H6SGgEiyslzGeDjZyMWJ6uy+ae
MydnFVor6diyzew3MwhCZJKxMu/UJYaECuUtazLWhQi3q0YbQlYMcIGHfp7jDpXa
1ibFAeRSri7PXTVqMNuJ1dftG7s08V55N1AB/3w9f8kkOOO2jZpwRauhIUJA++Xh
Iq6M+PLEvBky6g/v6zOf7/68LtseuaSmMw7GxRVXX2BcrEjSLVz24INa24ZxM87P
qQ==
-----END CERTIFICATE-----
This must be formatted for use in the JSON payload by replacing new line characters with embedded new line characters, an example command to do this:
awk 'NF {sub(/\r/, ""); printf "%s\n",$0;}'
Obtaining an asset template
- Log into the
Manager UIand navigate to the asset viewer - Create then select an asset of the same type that you want to use in the template then select the asset ID from the address bar (e.g.
https://staging.demo.openremote.io/manager/?realm=smartcity#/assets/false/2K3nSg148fnzlSlaem0kkh->2K3nSg148fnzlSlaem0kkh) - Navigate to Swagger UI (https://your_installation/swagger e.g. https://staging.demo.openremote.io/swagger)
- Click authorize then again on the popup dialog then login with a user from the master realm
- Once authenticated go to
Assets -> Get /asset/{assetId}and paste the asset ID into the asset ID input then execute the query, you will then get the asset returned injsonformat: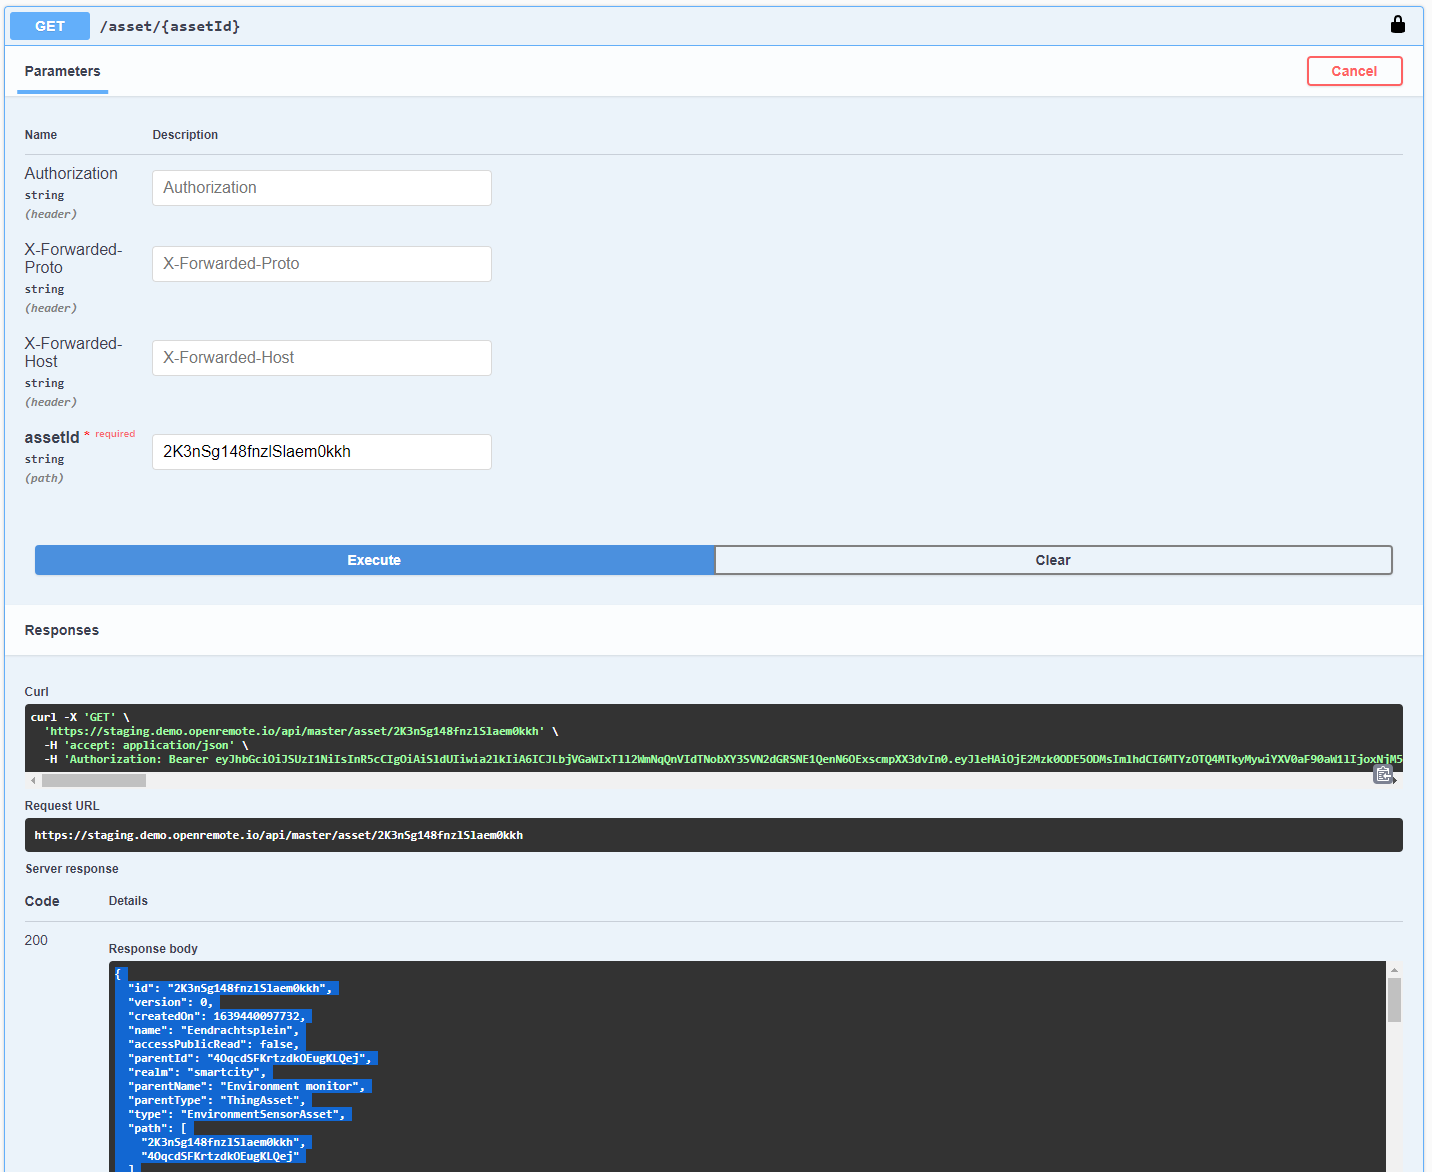
- You can copy the returned
jsonand paste that into theAsset templateinput field:- Remove or set the
parentIdto determine where in the asset tree the asset will be created - remember to insert the
%UNIQUE_ID%placeholder wherever you would like that to be used (in an attribute value, in the asset name, etc.)
- Remove or set the