Setting up an IDE
This guide helps you set up an environment with an IDE when you are done Preparing the environment, so you can work comfortably on the Manager backend services.
This is not necessary if you prefer Working on the UI only, any file manager and text editor will suffice.
Download custom-project
- Using Git, clone the custom-project repo
cdinto the custom-project directory, and add the openremote submodule, using thegit submodule initandgit submodule updatecommands
Run Docker container
If you have successfully downloaded your custom-project, you can build the Docker container by running one of the following commands from your custom-project directory:
Without SSL and proxy
docker-compose -p openremote -f profile/dev-testing.yml up --build -d
With SSL and proxy
docker-compose -p openremote -f profile/dev-proxy.yml up --build -d
You will need to add the following environment variables within your IDE for the manager to work behind the proxy with SSL:
WEBSERVER_LISTEN_HOST=0.0.0.0
IDENTITY_NETWORK_WEBSERVER_PORT=443
IDENTITY_NETWORK_SECURE=true
Importing a project in an IDE
IntelliJ IDEA
You can download the IntelliJ Community Edition for free.
- Choose the 'Open' option in the startup screen and open the root directory of the OpenRemote codebase.
- Note that IntelliJ might time out if a background Gradle process (for example, running the GWT compiler server) blocks the Gradle import. Stop and start the background process to unblock.
- Verify the build settings: Settings/Preferences -> Build,Execution,Deployment -> Build Tools -> Gradle:
- Configure for 'Build and run using' the option 'IntelliJ IDEA'
- Configure for 'Run tests using' the option 'Gradle'
- Click on 'Apply'
- Run
./gradlew clean installDistin a terminal in IntelliJ to be sure everything compiles.
Recommended Plugins
Grep Console Styling
The log messages of the running application can be colour-highlighted with the GrepConsole plugin and our configuration.
- Locate XML style config for Grep Console in openremote/tools/intellij
- Choice the default or dark styling config
- Copy the xml to your IntelliJ IDEA Config folder
cp ~/<PATH_TO_PROJECT>/openremote/tools/intellij/Theme-<Default|Darcula>-GrepConsole.xml \
~/.IntelliJIdea<VERSION>/config/options/GrepConsole.xml
Eclipse
- Run
./gradlew eclipse - In Eclipse go to
File>Importand import the project asExisting Projects into Workspace
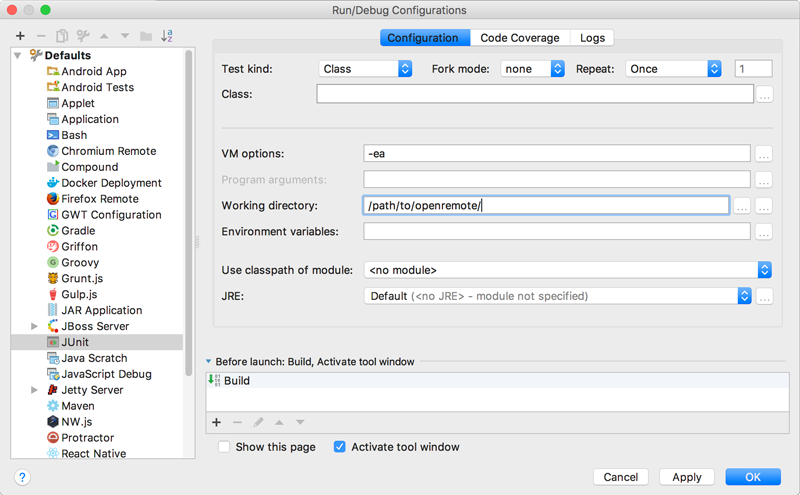
Setting the working directory
All Docker and Gradle commands must be executed in the project root directory. If you are working on the main OpenRemote repository, this means the root of the repository. If you are Creating a custom project, this means the root of your project's repository.
The working directory in your IDE however must always be set to the OpenRemote project directory. All configuration settings in source code default to this location. This means if you are Creating a custom project, your IDE will work in the openremote submodule directory.
We recommend you set this as the default directory in your IDE for all Run Configurations. To improve creation and execution of ad-hoc tests in the IDE you should set the default working directory for JUnit Run Configurations:
In newer versions of IntelliJ you need to change some run options. Go to Preferences -> Build,Execution,Deployment -> Build Tools -> Gradle:
- Configure for 'Build and run using' the option 'IntelliJ IDEA'
- Configure for 'Run tests using' the option 'Gradle'
- Click on 'Apply'
Running and debugging the Manager
The main entry point of the backend services is a Java class for the OpenRemote Manager, this process provides the frontend API and is the core of OpenRemote.
Make sure required testing services (dev-testing.yml) are running as described above.
If you are using the custom project repository as starting point the run configurations will already be set up. If not, set up a Run Configuration:
- Module/Classpath:
custom-project.setup.mainfor custom projects - Working directory: Must be set to OpenRemote main project directory!
- Main class:
org.openremote.manager.Main - Any environment variables that customise deployment (usually custom projects have some)
Accessing the Manager UI
The manager UI web application isn't compiled until build time.
To run the manager app run npm run serve from the /openremote/ui/app/manager directory.
You can then access the manager UI at: http://localhost:9000/manager/ (NOTE: the trailing slash is required here)
The default login is username admin with password secret.
The web server binds to only localhost interface (i.e. 127.0.0.1). You can override this with WEBSERVER_LISTEN_HOST=0.0.0.0 to bind to all interfaces and make it accessible on your LAN.
Go to Working on the UI for more information.
VisualVM
To inspect the threads, analyzing CPU and memory allocation you should running a VisualVM.
- Download and install VisualVM from the VisualVM website.
- Install the VisualVM Launcher for IntelliJ IDEA
Executing tests
Any JUnit test can be directly executed, you can create a Run Configuration for the test module and run all tests in the IDE. Ensure that the profile/dev-testing.yml background service stack is running, as described above.