MQTT
There is an MQTT Agent (Client) in OpenRemote that you can use to connect to an external MQTT Broker. First use the MQTT Agent to establish the connection to the broker. Then create an asset with attribute(s) of the Value Type that matches the incoming/outgoing data, and give those attributes the configuration item 'Agent Link'. In this agent link select your MQTT Agent and add the parameter Publish Topic or Subscription Topic. We have no extensive documentation yet, and recommend to check our forum.
OpenRemote also has an MQTT Broker (or MQTT API).
Connecting to an MQTT broker using (m)TLS, AWS IoT Core
AWS IoT Core provides the option to authenticate clients to the MQTT broker using X.509 Client Certificates. To do so, we will need to add the X.509 client certificates assigned to the Thing we have created to OpenRemote's realm-specific KeyStores. Below is a tutorial of how that can be done;
You will need to have keytool installed; this can also be done using any GUI for keystores (ex. KeyStore Explorer).
After creating a Thing in AWS IoT Core, you need to retrieve its certificate, its private key, and Amazon's Root CA certificate.
They are all provided after accessing that thing's dashboard and creating a new certificate for it: 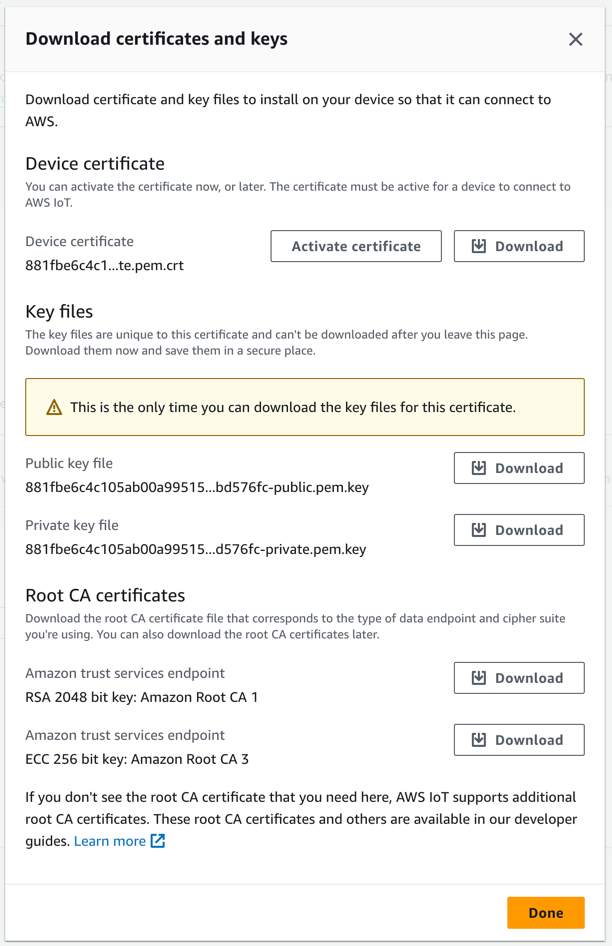
Download the Device Certificate and activate it, download the private key file, and the Amazon Trust Services endpoint RSA 2048 bit key.
The password of everything keystore-related is OR_ADMIN_PASSWORD, for when it is requested.
Make sure that OpenRemote has been started at least once before proceeding, so that the required keystore files are created automatically. If you have a pre-existing keystore file, make sure to provide the file's location using OR_SSL_CLIENT_KEYSTORE_FILE, OR_SSL_CLIENT_TRUSTSTORE_FILE, and OR_SSL_CLIENT_KEYSTORE_PASSWORD or OR_SSL_CLIENT_TRUSTSTORE_PASSWORD for their passwords.
After doing so, we need to:
- Combine the certificate and Private Key into a PKCS#12 keypair file, so that it can be easily imported into the KeyStore:
openssl pkcs12 -export -in OpenRemoteAWSCertificate.pem.crt -inkey OpenRemoteAWSPrivate.key -out OpenRemoteAWSKeyPair.p12 -name openremoteagent
- Import the keypair into the existing keystore.
Warning! the alias you use here will be used to distinguish between keypairs to be used in different agents. For this to work, you will need to use the following format; <the realm where you will be creating the agent>.<an alias you will enter into the OpenRemote agent configuration>. For example, we will use master.OpenRemoteAwsIoTClientCertificate. So we will be creating the agent in the master realm, and the certificate alias we will provide is OpenRemoteAwsIoTClientCertificate.
keytool -importkeystore -destkeystore <storage dir>/client_keystore.p12 -srckeystore OpenRemoteAWSKeyPair.p12 -srcstoretype PKCS12 -alias master.OpenRemoteAwsIoTClientCertificate
- Import the Amazon Root CA certificate into the truststore;
keytool -importcert -file AmazonRootCA1.pem -keystore <storage dir>/client_truststore.p12 -alias amazonrootca1
Now, we are ready to start OpenRemote again, and create a new MQTT Agent.
Make sure that the Agent is situated in the realm that is specified in the Alias from the command above, or else OpenRemote will not be able to retrieve the correct certificate. An error will be logged with more information if that happens.
In that agent, ensure that you have set:
- The correct host and port (AWS IoT Core MQTT broker is set to
8883) - Secure mode turned on
- Set the certificate alias to the alias we set above, without the realm and the
.:OpenRemoteAwsIoTClientCertificate. The alias is used to allow the MQTT agent to select the correct certificate to use for the authentication. - Set the client ID, ensuring that it is allowed by the created Policy of the thing (Check AWS IoT Dashboard->
<your thing's name>->Certificate->Policy to verify)
The agent attempts to connect, and it successfully authenticates and connects to the MQTT broker, ready to pub/sub according to your needs.